Any app worth it’s salt will almost certainly have at least one, if not more than one, image picker. The image picker feature is included in a variety of major applications, including Facebook, Twitter, Instagram, and WhatsApp, amongst others. This feature allows users to choose files from their own device to use as a profile picture or to share with their friends. Setting an avatar for the user profile is by far the most typical function for an image picker to perform in a mobile application. In this guide, we’ll walk you through the process of developing an image picker using Flutter. An example Flutter app will be developed in which the user may either choose a picture from the gallery or snap a photo using the device’s camera.
Setting Up the Flutter Image Picker Project
First, we need to create a new Flutter project. For that, make sure that the Flutter SDK and other flutter app development-related requirements are properly installed. If everything is properly set up, then in order to create a project, we can simply run the following command in the desired local directory:
flutter create image_picker_example
After the project has been set up, we can navigate inside the project directory and execute the following command in the terminal to run the project in either an available emulator or an actual device:
flutter run
You should be seeing this default flutter app screen:

Creating The Home Page UI
Now, we are going to create a home page Scaffold. For that, we need to create a file called home_page.dart. Inside the file, we can use the code from the following code snippet:
import 'dart:io';

import 'package:flutter/material.dart';

class HomePage extends StatefulWidget {
  const HomePage({Key? key}) : super(key: key);

  @override
  HomePageState createState() => HomePageState();
}

class HomePageState extends State<HomePage> {
  File? image;

  @override
  Widget build(BuildContext context) {
    return Scaffold(
      appBar: AppBar(
        title: const Text('Image Picker Example'),
        centerTitle: true,
      ),
      body: Center(
        child: Column(
          children: [
            ElevatedButton(
              style: ElevatedButton.styleFrom(
                primary: Colors.blue,
                textStyle: const TextStyle(
                  color: Colors.white,
                  fontSize: 18,
                  fontWeight: FontWeight.bold,
                ),
              ),
              onPressed: () {},
              child: const Text('Pick Image from Gallery'),
            ),
            ElevatedButton(
              style: ElevatedButton.styleFrom(
                primary: Colors.blue,
                textStyle: const TextStyle(
                  color: Colors.white,
                  fontSize: 18,
                  fontWeight: FontWeight.bold,
                ),
              ),
              onPressed: () {},
              child: const Text('Pick Image from Camera'),
            ),
            if (image != null) Image.file(image!)
          ],
        ),
      ),
    );
  }
Here, we have returned a simple Scaffold widget with an App Bar and a body from the stateless widget class called HomePage. Now, we need to import this stateful widget class in our main.dart file and assign it to the home option of the MaterialApp widget as shown in the code snippet below:
import 'package:flutter/material.dart';
import 'package:image_picker_example/home_page.dart';

void main() => runApp(const MyApp());

class MyApp extends StatelessWidget {
  const MyApp({Key? key}) : super(key: key);

  @override
  Widget build(BuildContext context) {
    return const MaterialApp(
      debugShowCheckedModeBanner: false,
      home: HomePage(),
    );
  }
}
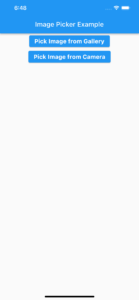
Now if we re-run the app, we will get the following result in our emulator screen:
iOS Setup:
Add the following keys to your Info.plist file, located in <project root>/ios/Runner/Info.plist:
- NSPhotoLibraryUsageDescription – describe why your app needs permission for the photo library. This is called Privacy – Photo Library Usage Description in the visual editor.
- NSCameraUsageDescription – describe why your app needs access to the camera. This is called Privacy – Camera Usage Description in the visual editor.
- NSMicrophoneUsageDescription – describe why your app needs access to the microphone, if you intend to record videos. This is called Privacy – Microphone Usage Description in the visual editor.
Android Setup:
No configuration required – the plugin should work out of the box.
Adding image_picker:
open up pubspec.yaml file and add the dependency for image picker package under dependencies bloc
image_picker: ^0.8.5+3
then in home_page.dart file, you’ll have to import the package like this
import 'package:image_picker/image_picker.dart';
and then initialize the a final instance of the package that we will be using in the next steps:
final ImagePicker imagePicker = ImagePicker();
To launch the picture selection dialog, we’ll use the picker instance’s public method pickImage(ImageSource) the following function utilizes this method to get the image:
pickImage(ImageSource source) async {
  XFile? xFileImage = await imagePicker.pickImage(source: source);
  if (xFileImage != null) {
    image = File(xFileImage.path);
    setState(() {});
  }
}
The image source is used to determine where should we get the image from, we have two options:
1- ImageSource.gallery : this source displays the already existing images in the phone’s gallery to choose the image from
2- ImageSource.camera : this source opens up the phone’s camera to capture a photo with it
after we called the pickImage public method we assign the result into the image file variable and we setState to show the result.
Final steps:
Now if you try to click any button of the two buttons, nothing happens.
That’s because we haven’t called our method when the buttons are pressed, first we change the onPressed of the first button to this:
onPressed: () => pickImage(ImageSource.gallery),
Then we change the second button’s onPressed to this:
onPressed: () => pickImage(ImageSource.camera),
final full home_page.dart code should look like this:
import 'dart:io';

import 'package:flutter/material.dart';
import 'package:image_picker/image_picker.dart';

class HomePage extends StatefulWidget {
  const HomePage({Key? key}) : super(key: key);

  @override
  HomePageState createState() => HomePageState();
}

class HomePageState extends State<HomePage> {
  final ImagePicker imagePicker = ImagePicker();
  File? image;

  @override
  Widget build(BuildContext context) {
    return Scaffold(
      appBar: AppBar(
        title: const Text('Image Picker Example'),
        centerTitle: true,
      ),
      body: Center(
        child: Column(
          children: [
            ElevatedButton(
              style: ElevatedButton.styleFrom(
                primary: Colors.blue,
                textStyle: const TextStyle(
                  color: Colors.white,
                  fontSize: 18,
                  fontWeight: FontWeight.bold,
                ),
              ),
              onPressed: () => pickImage(ImageSource.gallery),
              child: const Text('Pick Image from Gallery'),
            ),
            ElevatedButton(
              style: ElevatedButton.styleFrom(
                primary: Colors.blue,
                textStyle: const TextStyle(
                  color: Colors.white,
                  fontSize: 18,
                  fontWeight: FontWeight.bold,
                ),
              ),
              onPressed: () => pickImage(ImageSource.camera),
              child: const Text('Pick Image from Camera'),
            ),
            if (image != null) Image.file(image!)
          ],
        ),
      ),
    );
  }

  pickImage(ImageSource source) async {
    XFile? xFileImage = await imagePicker.pickImage(source: source);
    if (xFileImage != null) {
      image = File(xFileImage.path);
      setState(() {});
    }
  }
}
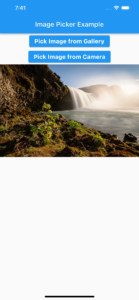
Now everything should work as expected and you can pick the image and see the picked image under the buttons like this:
Conclusion
During this session, we gained a great deal of knowledge. To begin, we presented many examples of typical applications for the Flutter image picker component. After that, we debuted the image picker plugin that was built for Flutter. We went through the steps necessary to initialize the ImagePicker class of the image picker plugin and went over the functions that are included inside the ImagePicker class.
In the end, we developed a Flutter project to show how to utilize the image picker plugin in a scenario that is based on the real world.
