How to Integrate Facebook Login in Flutter

Providing your users with the option to login with Facebook is one of the best growth hacks ever. Making the sign up & login process as frictionless as possible, by using the Facebook Login button, will skyrocket your conversion on the onboarding screens. Let’s take a look and see how to integrate Facebook Login in Flutter.
In modern-day web and mobile applications, there is a maximum chance for the availability of social login options. Many web and mobile applications provide their own registration and login option along with social login options. The majority of people will surely choose the social login options as it is much easier and efficient. No extra credentials to remember for different platforms. We can simply use the social login information to log in to different websites and mobile applications. These social logins surely make the login and registration process much simpler. One we do not have to remember the credentials and the other the login will be successful with just a few clicks of buttons. No need to feel the hefty forms for registration and remember the credentials as well. Hence, social logins should be the integral service to provide in any application which needs registration to access the services.
In this tutorial, we are going to integrate one of those social logins called the Facebook login service in our Flutter application. The tutorial will demonstrate each and every step required to integrate Facebook login to the flutter application with detailed instruction. The tutorial will also show the stepwise creation of the Facebook app from the Facebook developers console and steps to enable the Facebook login service in the Facebook app as well. Then, we are going to make use of the package called flutter_facebook_auth to connect the Facebook app with the Flutter application. Lastly, we will devise the UI and implement functions to carry out Facebook login in our Flutter application.
Mega Bundle Sale is ON! Get ALL of our React Native codebases at 90% OFF discount 🔥
Get the Mega BundleSo, let's get started!
Setting Up the Flutter project
First, we need to create a new Flutter project. For that, make sure that the Flutter SDK and other flutter app development-related requirements are properly installed. If everything is properly set up, then in order to create a project, we can simply run the following command in the desired local directory:
flutter create fb_login_example
After the project has been set up, we can navigate inside the project directory and execute the following command in the terminal to run the project in either an available emulator or an actual device:
flutter run
Scaffolding the project
Now, we are going to scaffold the default project and turn the UI into what we want. We are going to remove the default flutter project code and replace it with our own UI code. Here, we are going to have a log-in button that will help us trigger the Facebook login. After successful login, we are going to display the logout button. All the changes are to be made in the main.dart file itself. The overall code for the UI is provided in the code snippet below:
import 'package:flutter/material.dart';
void main() {
runApp(MyApp());
}
class MyApp extends StatelessWidget {
// This widget is the root of your application.
Widget build(BuildContext context) {
return MaterialApp(
title: 'Flutter FB login Demo',
theme: ThemeData(
primarySwatch: Colors.blue,
),
home: MyHomePage(),
);
}
}
class MyHomePage extends StatefulWidget {
MyHomePage({Key key}) : super(key: key);
_MyHomePageState createState() => _MyHomePageState();
}
class _MyHomePageState extends State<MyHomePage> {
bool _isLoggedIn = false;
Map _user;
Widget build(BuildContext context) {
return Scaffold(
appBar: AppBar(
title: Text("Facbook login example"),
),
body: Container(
child: _isLoggedIn
? Column(
mainAxisAlignment: MainAxisAlignment.center,
crossAxisAlignment: CrossAxisAlignment.center,
children: [
TextButton(
onPressed: () {
},
child: Text("Logout"))
],
)
: Center(
child: ElevatedButton(
child: Text("Login with Facebook"),
onPressed: () async {
},
),
),
),
);
}
}
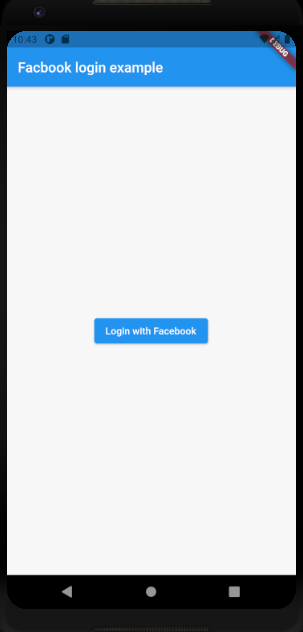
Here, we have the full code of main.dart file. We have created the MyHomePage widget which returns a Scaffold widget with App Bar and body property having a Container widget as a parent.
The child of the Container widget is equipped with conditional rendering. The state _isLoggedIn is used to handle the login state. If it is false then we render out the login button else
we show the logout button. The _user Map object is used to store the response result after the login is successful. This map variable will hold the user data from Facebook.
Hence, we will get the following UI result in the emulator:
Mega Bundle Sale is ON! Get ALL of our React Native codebases at 90% OFF discount 🔥
Get the Mega BundleCreate a Facebook App
Now, we need to create and configure the Facebook application that will enable us to activate the Facebook login feature. The method is to link our Flutter application with the Facebook application which has a Facebook login feature enabled.
First, we need to log in to the Facebook developers console console. After the successful login, we will get the following screen in the browser:
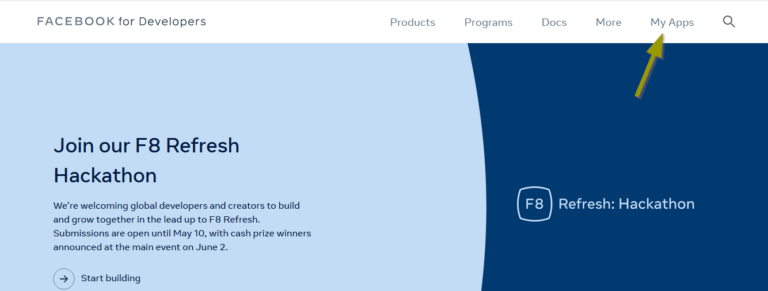
Now, we need to click on ‘My Apps‘ which will lead us to the Apps console as shown in the screenshot below:
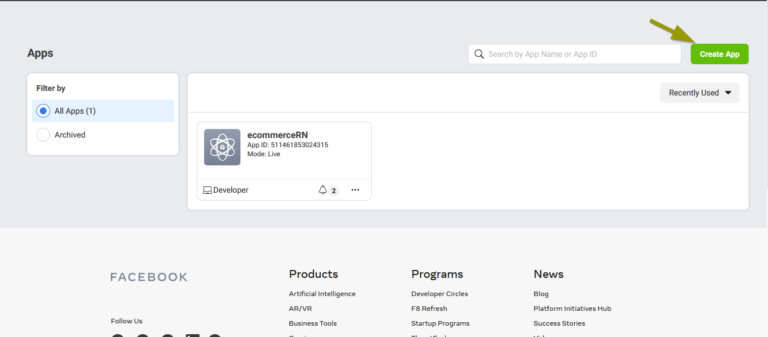
Here, we need to click on the ‘Create App‘ button as directed which will open a dialog box as shown in the screenshot below:
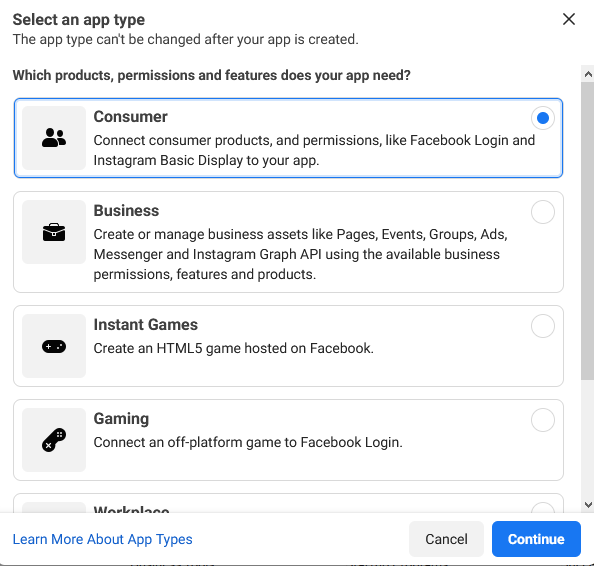
From the dialog, we need to select the app type and click on the ‘Continue‘ button. This will lead us to another dialog where we need to input our Facebook app display name as shown in the code snippet below:
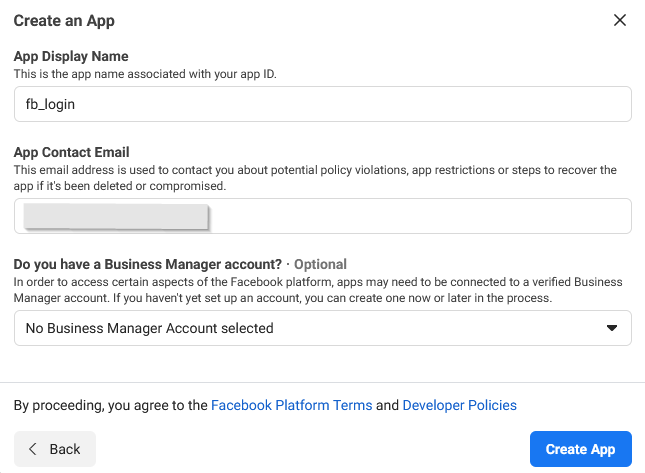
After entering the App name, we need to click on ‘Create App‘ button.
Now the Facebook app will be successfully created and we will be redirected to the app dashboard screen as shown in the screenshot below:
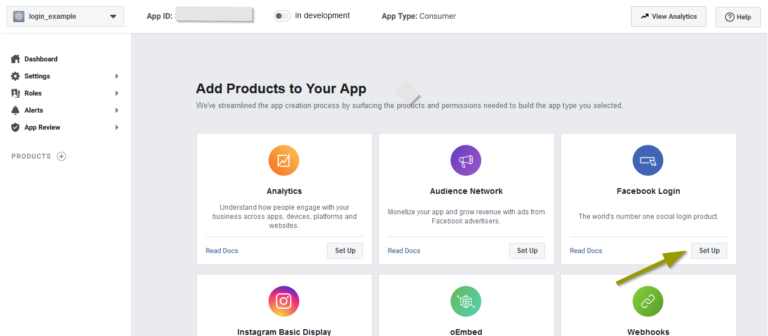
The dashboard shows the

App ID, App type along with other products that we can enable.
Setting up Facebook Login Service
Now, our main aim is to set up the Facebook login feature. Hence, we need to click on the ‘Set Up‘ button of the Facebook Login service.
Then, we will be directed to the screen where we can select the app platform to enable the Facebook Login service as shown in the screenshot below:
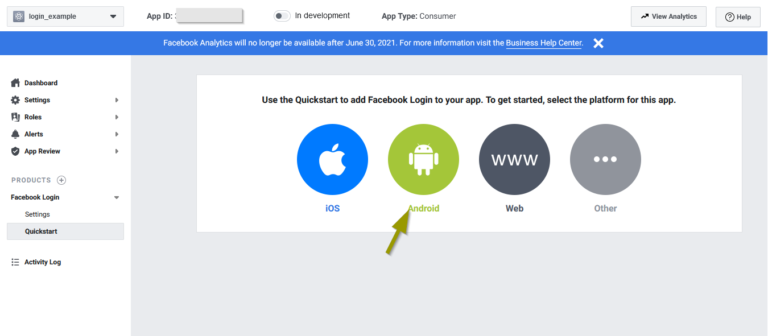
Since we are going to configure for the Android platform, we need to click on ‘Android‘.
After that, a page will open where we have to complete the number of steps to enable the Facebook login service. All the steps are equipped with detailed instruction as well.
Here, we directly need to jump to step 3 where we need to add our flutter app package name and main activity name. This we can get from the AndroidManifest.xml file in the location ./android/app/src/main/. Then, we can enter the package name and activity class name as directed in the screenshot below:
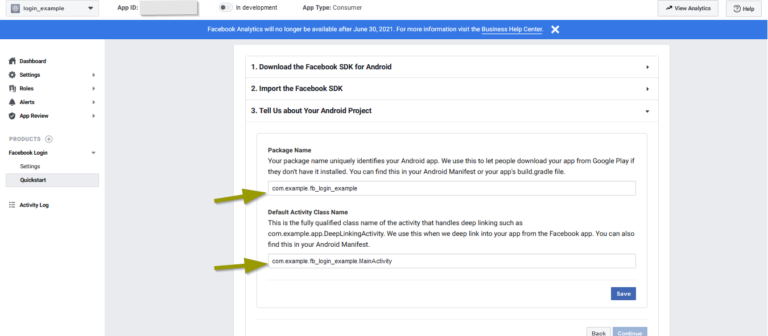
Then, we need to click on ‘Save’ button and press ‘Continue‘.
Now, the next step is to generate the hash key to enable the service. All the required instructions will be already provided in that particular step itself.
We need to look at the instruction for the Windows platform as shown in the screenshot below:
Now in order to generate the hash key, we have following requirements in our Windows system.
- Key and Certificate Management Tool (keytool) from the Java Development Kit.
- openssl-for-windows OpenSSL library for Windows which we can download from
Google Code Archive. Make sure to download this library and extract it in the
C:\drive.
Now to generate a development key hash, we need to run the following command in a command prompt in the Java SDK folder (C:\Program Files\Java\jdk\bin):
keytool -exportcert -alias androiddebugkey -keystore
"C:\\Users\\USERNAME\\.android\\debug.keystore" |
"PATH_TO_OPENSSL_LIBRARY\\bin\\openssl" sha1 -binary |
"PATH_TO_OPENSSL_LIBRARY\\bin\\openssl" base64
In the above command, we need to change the location based on installed files in our system.
After successful execution of the command, we will get the 28-character string which is a hash key. We need to copy that hash key and paste it in the location shown by the screenshot below:
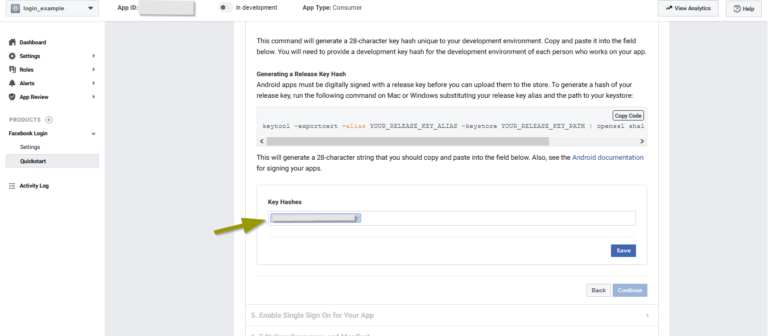
Then, we need to click on ‘Save‘ and �‘Continue‘ buttons.
This successfully activates the Facebook login service in our Facebook app.
Now we need to connect our Facebook app with our Flutter application. Hence, we need to move back to our flutter project.
Installing the Flutter Plugin
In order to connect our Facebook app with its services with the Flutter project, we are going to make use of the plugin called flutter_facebook_auth. This package enables us to add a Facebook login to our Flutter app, get user information, profile picture, and more. For detailed information about the plugin along with configuration steps, we can check out its official documentation.
Now, to install the package, we need to add the plugin to our pubspec.yaml file as shown in the code snippet below:
dependencies:
  flutter:
    sdk: flutter
  flutter_facebook_auth: ^3.3.3+1
Now, we need to make some configurations in the Android native files in order to get this plugin working properly in our project.
First, we need to edit our Resources and Manifest and add following config to our android project:
- We need to open our ./android/app/src/main/res/values/strings.xml file, or create one if it doesn’t exist.
- Then, we need to add the following (replace
{your-app-id}with your Facebook app Id) piece of code to the strings.xml file:
<string name="facebook_app_id">{your-app-id}</string>
<string name="fb_login_protocol_scheme">fb{your-app-id}</string>
The example code of strings.xml file is shown in the code snippet below:
<?xml version="1.0" encoding="utf-8"?>
<resources>
  <string name="app_name">Flutter Facebook Auth Example</string>
  <string name="facebook_app_id">000000000000000</string>
  <string name="fb_login_protocol_scheme">fb0000000000000</string>
</resources>
Here, we need to edit App name and App ID based on the Android app in the Facebook developers console.
Mega Bundle Sale is ON! Get ALL of our React Native codebases at 90% OFF discount 🔥
Get the Mega BundleNow, we need to go to the ./android/app/src/main/AndroidManifest.xml file and add the following uses-permission element after the application element:
<uses-permission android:name="android.permission.INTERNET"/>
Then, we need to add the following meta-data element, an activity for Facebook, and activity and intent-filter
for Chrome Custom Tabs inside our application element in the AndroidManifest.xml file:
<meta-data android:name="com.facebook.sdk.ApplicationId" android:value="@string/facebook_app_id"/>
 <activity android:name="com.facebook.FacebookActivity"
     android:configChanges="keyboard|keyboardHidden|screenLayout|screenSize|orientation"
     android:label="@string/app_name" />
 <activity
     android:name="com.facebook.CustomTabActivity"
     android:exported="true">
     <intent-filter>
         <action android:name="android.intent.action.VIEW" />
         <category android:name="android.intent.category.DEFAULT" />
         <category android:name="android.intent.category.BROWSABLE" />
         <data android:scheme="@string/fb_login_protocol_scheme" />
     </intent-filter>
 </activity>
After all the configuration, we need to make sure to install the app in the emulator once again. For that, we can delete the app from the emulator and run the app again.
Implementing Facebook Login in Flutter App
Now, we are going to implement functions for Facebook login in our flutter app. For that,
we are going to make use of the FacebookAuth instance from the flutter_facebook_auth package
Now, we are going to create a function called _performLogin inside the MyHomePageState class of main.dart file as shown in the code snippet below:
_performLogin() async{
  FacebookAuth.instance.login(
      permissions: ["public_profile", "email"]).then((value) {
    FacebookAuth.instance.getUserData().then((result) {
      setState(() {
        _isLoggedIn = true;
        _user = result;
      });
    });
  });
In the function, we have used the login method provided by the FacebookAuth instance. We have requested the permissions
for the public_profile image and email. Then, we have used the getUserData() method to get the user data and set the user
data to _user map object and set _isLoggedIn state to true using the setState method.
Now, we need to call the _performLogin() function to the onPressed event of the ElevatedButton widget as shown in the code snippet below:
Center(
  child: ElevatedButton(
    child: Text("Login with Facebook"),
    onPressed: () async {
      _performLogin();
    },
  ),
),
After the login, we will get the user info as well in the _user map object. We can display this information as well on the screen after the login.
For that, we can make use of the code from the following code snippet:
body: Container(
        child: _isLoggedIn
        ? Center(
          child: Column(
              mainAxisAlignment: MainAxisAlignment.center,
              crossAxisAlignment: CrossAxisAlignment.center,
              children: [
                Image.network(_user["picture"]["data"]["url"]),
                Text(_user["name"]),
                Text(_user["email"]),
                TextButton(
                  onPressed: () {
                    _performLogout();
                  },
                  child: Text("Logout")
                )
              ],
            ),
        )
        :
Implementing the Logout Functionality
Now, we are going to implement the logout function. For that, we need to create a function called _performLogout and use the code from the following code snippet:
_performLogout() async{
   FacebookAuth.instance.logOut().then((value) {
    setState(() {
      _isLoggedIn = false;
      _user = null;
    });
  });
}
Here, we have used the logOut method provided by the FacebookAuth instance and after its success, we have set the _isLoggedIn to false and _user object to null.
Lastly, we need to call the function in the onPressed event of the logout TextButton widget as shown in the code snippet below:
TextButton(
  onPressed: () {
    _performLogout();
  },
  child: Text("Logout")
)
Hence, the final demo of our implementation of Facebook login is demonstrated below:
Image not loading
Hence, we have successfully integrated the Facebook login feature in our Flutter application for the Android platform.
Bottom Line
The main objective of this tutorial was to demonstrate the integration of the Facebook login service in the Flutter application. The tutorial presents the detailed stepwise instructions to create the Facebook application, enable the Facebook login service and connect it with the flutter environment. The connection between the Facebook application along with the Facebook login service with the flutter environment was made possible by the availability of the flutter_facebook_auth package.
The configuration of the Facebook login service in the Facebook app was a little complex but the stepwise instruction from this tutorial will definitely make it easier. The configuration to native files in the flutter project to enable the plugin to work properly was also shown in detail.
Looking for a custom mobile application?
Our team of expert mobile developers can help you build a custom mobile app that meets your specific needs.
Get in TouchLastly, the UI for Facebook Login along with all the functions were created to successfully implement the Facebook login service in the Flutter application. There are other social login options that can be integrated easily in Flutter applications as well as using services from Firebase. This can be one of the next challenges for you to integrate yourself next.