Flutter Local Authentication using Biometrics – Face ID, Touch ID, Fingerprint
As the Flutter community grows, it is also creating a variety of libraries to support the native functionality. When a user’s fingerprints, facial characteristics, or voice are used to authenticate their identification, this is referred to as biometric authentication. Let’s see how you can implement Local Authentication for Biometrics in Flutter. Almost every phone on the market today has some kind of biometric authentication. We no longer need to type in a password since we can just press our fingerprints to verify our identity.
Getting Started with local_auth package
Import local_auth Package
First off, include the local_auth package by adding this to your project by heading to pubspec.yaml and running flutter pub get :
dependencies:
  flutter:
    sdk: flutter
  local_auth: 2.3.0
How to Use local_auth
This Flutter plugin enables us to authenticate users locally, on the device, using this feature. To check whether there is local authentication available on this device or not, call canCheckBiometrics (if you need biometrics support) and/or isDeviceSupported() (if you just need some device-level authentication):
import 'package:local_auth/local_auth.dart';

final LocalAuthentication auth = LocalAuthentication();
final bool canAuthenticateWithBiometrics = await auth.canCheckBiometrics;
final bool canAuthenticate =
    canAuthenticateWithBiometrics || await auth.isDeviceSupported();
Supported Biometric Types
Currently, the following biometric types are implemented:
BiometricType.faceBiometricType.fingerprintBiometricType.weakBiometricType.strong
Enrolled Biometrics
canCheckBiometrics indicates whether hardware support is available, not whether the device has any biometrics enrolled. To get a list of enrolled biometrics, call getAvailableBiometrics():
final List<BiometricType> availableBiometrics = await auth.getAvailableBiometrics();
if (availableBiometrics.isNotEmpty) {
  // Some biometrics are enrolled.
}
if (availableBiometrics.contains(BiometricType.strong) || availableBiometrics.contains(BiometricType.face)) {
  // Specific types of biometrics are available. Use checks like this with caution!
}
Options
The authenticate() method uses biometric authentication when possible, but also allows fallback to pin, pattern, or passcode.
try {
final bool didAuthenticate = await auth.authenticate(
localizedReason: 'Please authenticate to show account balance');
// ·�··
} on PlatformException {
// ...
}
To require biometric authentication, pass AuthenticationOptions with biometricOnly set to true:
final bool didAuthenticate = await auth.authenticate(
    localizedReason: 'Please authenticate to show account balance',
    options: const AuthenticationOptions(biometricOnly: true));
Biometrics Permission Dialogs
The plugin provides default dialogs for the following cases:
- Passcode/PIN/Pattern Not Set: The user has not yet configured a passcode on iOS or PIN/pattern on Android.
- Biometrics Not Enrolled: The user has not enrolled any biometrics on the device.
If a user does not have the necessary authentication enrolled when authenticate is called, they will be given the option to enroll at that point, or cancel authentication. If you don’t want to use the default dialogs, set the useErrorDialogs option to false to have authenticate return an error in those cases:
import 'package:local_auth/error_codes.dart' as auth_error;

try {
  final bool didAuthenticate = await auth.authenticate(
      localizedReason: 'Please authenticate to show account balance',
       options: const AuthenticationOptions(
          useErrorDialogs: false,
          biometricOnly: true,
          stickyAuth: true,
        ),)
  // ···
} on PlatformException catch (e) {
  if (e.code == auth_error.notAvailable) {
    // Add handling of no hardware here.
  } else if (e.code == auth_error.notEnrolled) {
    // ...
  } else {
    // ...
  }
}
Compatibility Considerations
For devices running Android versions lower than API 29 (Android Q), you can only check for fingerprint hardware. To support other biometrics like face scanning on lower SDKs, avoid calling getAvailableBiometrics. Instead, directly call authenticate with biometricOnly: true. This will return an error if the hardware is unavailable.
Sticky Auth
To handle interruptions during authentication (e.g., when a user receives a phone call), set the stickyAuth option to true. This prevents the plugin from returning a failure if the app is sent to the background. When the app resumes, it will retry authenticating automatically.
Biometric Authentication Integration in Flutter
- iOS Integration
- Android Integration
iOS Integration for Face ID / Touch ID
The local_auth plugin works with both Touch ID and Face ID. However, to use Face ID, you need to add the following key to your ios/Info.plist file:
<key>NSFaceIDUsageDescription</key>
<string>Why is my app authenticating using face id?</string>
Failure to include this will result in a dialog telling the user that your app has not been updated to use Face ID.
Android Fingerprint Integration
The plugin works on SDK 16+, but isDeviceSupported() will return false for devices below SDK 23 (Android 6.0).
Activity Changes
Ensure that your app uses FragmentActivity instead of Activity. If using FlutterActivity, update your AndroidManifest.xml file to reference FlutterFragmentActivity.
- Java
- Kotlin
Go to your MainActivity.java inside android/app/src/main/java/[your_package_name]/MainActivity.java
import io.flutter.embedding.android.FlutterFragmentActivity;

public class MainActivity extends FlutterFragmentActivity {}
Go to your MainActivity.kt inside your android/app/src/main/kotlin/[your_package_name]/MainActivity.kt
import io.flutter.embedding.android.FlutterFragmentActivity

class MainActivity : FlutterFragmentActivity {}
Local Auth Permissions
Update your AndroidManifest.xml to include the following permission:
<uses-permission android:name="android.permission.USE_BIOMETRIC" />
A Complete Code Example
Let’s look at our complete example of implementing the local_auth package
Add the following code into the main.dart file.
import 'dart:async';
import 'package:flutter/material.dart';
import 'package:flutter/services.dart';
import 'package:local_auth/local_auth.dart';
void main() {
runApp(const MyApp());
}
class MyApp extends StatefulWidget {
const MyApp({super.key});
State<MyApp> createState() => _MyAppState();
}
class _MyAppState extends State<MyApp> {
final LocalAuthentication auth = LocalAuthentication();
String _authorized = 'Not Authorized';
bool _isAuthenticating = false;
Future<void> _authenticate() async {
bool authenticated = false;
try {
setState(() {
_isAuthenticating = true;
_authorized = 'Authenticating';
});
authenticated = await auth.authenticate(
localizedReason: 'Let OS determine authentication method',
options: const AuthenticationOptions(
useErrorDialogs: true,
stickyAuth: true,
),
);
setState(() {
_isAuthenticating = false;
});
} on PlatformException catch (e) {
debugPrint('$e');
setState(() {
_isAuthenticating = false;
_authorized = "Error - ${e.message}";
});
return;
}
if (!mounted) return;
setState(
() => _authorized = authenticated ? 'Authorized' : 'Not Authorized');
}
void _cancelAuthentication() async {
await auth.stopAuthentication();
setState(() => _isAuthenticating = false);
}
void initState() {
super.initState();
}
Future<bool> _checkBiometric() async {
bool canCheckBiometrics;
try {
canCheckBiometrics =
await auth.canCheckBiometrics || await auth.isDeviceSupported();
} on PlatformException catch (e) {
debugPrint('$e');
canCheckBiometrics = false;
}
return canCheckBiometrics;
}
Widget build(BuildContext context) {
return MaterialApp(
debugShowCheckedModeBanner: false,
home: Scaffold(
appBar: AppBar(
title: const Text('Biometric Authentication'),
),
body: Center(
child: FutureBuilder<bool>(
future: _checkBiometric(),
builder: (context, snapshot) {
if (snapshot.connectionState == ConnectionState.waiting) {
return const CircularProgressIndicator();
} else if (snapshot.hasError) {
return const Text('Error checking biometrics');
} else if (snapshot.hasData && !snapshot.data!) {
return const Text('Biometrics not supported on this device');
} else {
return Column(
mainAxisAlignment: MainAxisAlignment.center,
children: [
Text('Current State: $_authorized\n'),
(_isAuthenticating)
? ElevatedButton(
onPressed: _cancelAuthentication,
child: const Row(
mainAxisSize: MainAxisSize.min,
children: [
Text("Cancel Authentication"),
Icon(Icons.cancel),
],
),
)
: Column(
children: [
ElevatedButton(
onPressed: _authenticate,
child: const Row(
mainAxisSize: MainAxisSize.min,
children: [
Text('Authenticate'),
Icon(Icons.fingerprint),
],
),
),
],
),
],
);
}
}),
),
),
);
}
}
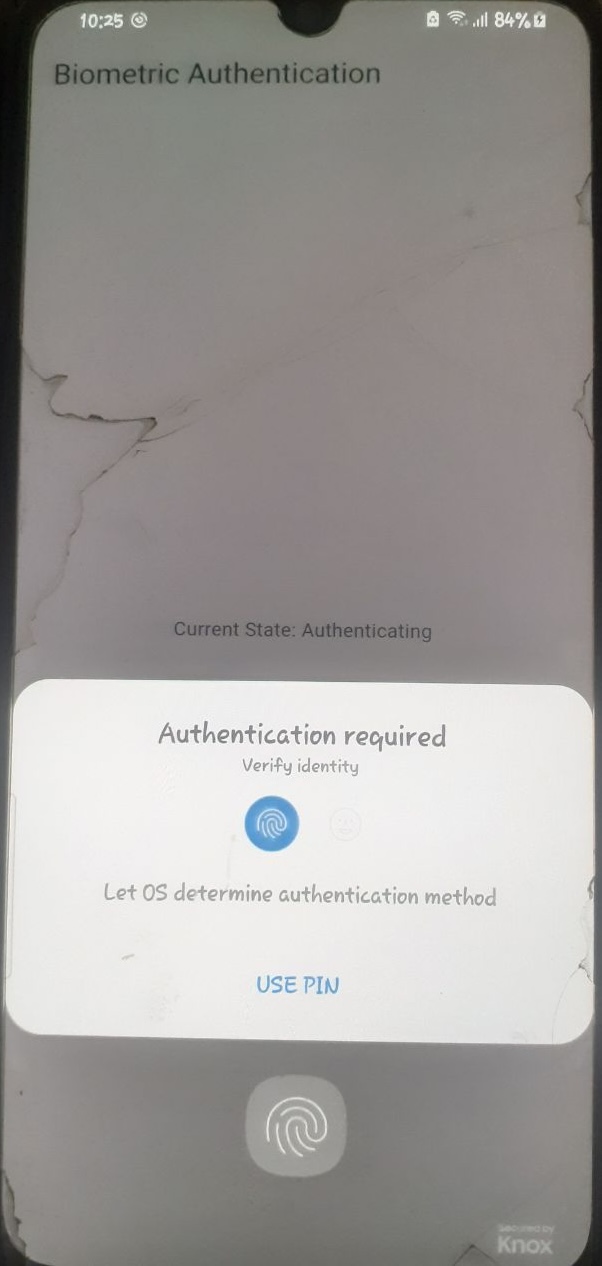
This would allow you to do the below: