How To Create Your First Flutter App
Flutter is a cross-platform application development framework released in December 2018 by Google. Since then, its community has been growing rapidly, and the Flutter framework is being adopted by many top-level software development companies. Let’s take a look at how you can create your first Flutter app in no time.
We can develop beautiful and intuitive native applications with pixel-perfect UI development schemes provided by the Flutter framework. Flutter introduces the widget-based UI development where we stack widgets together to form a UI element. Widgets have their own properties which can be customized to take any shape, position, and style. Overall, it makes UI development very easy and simple. The logical portion depends on Dart programming. There are already a lot of powerful Flutter packages to integrate any sort of feature in the application. It targets both Android as well as iOS platforms. In this tutorial, we are going to explore the basics of Flutter development. The tutorial teaches how to get started with Flutter programming. From creating projects to making API calls, we are going to learn some of the basic use cases in the Flutter ecosystem to create a simple app that displays the list of countries. So, let’s get started with our first Flutter app!
Mega Bundle Sale is ON! Get ALL of our React Native codebases at 90% OFF discount 🔥
Get the Mega BundleInstall Flutter
The overall process of installing Flutter into the local system is pretty easy. You can check out the official Flutter documentation for the detailed installation process.
Create a New Flutter project
First, we need to create a new Flutter project. For that, make sure that the Flutter SDK and other Flutter app development related requirements are properly installed. If everything is properly set up, then in order to create our first Flutter project, we can simply run the following command in the desired local directory:
flutter create flutterExample
After the project has been set up, we can navigate inside the project directory and execute the following command in the terminal to run the project in either an available emulator or an actual device:
flutter run
After successful built, we will get the following result in the emulator screen, which is an empty Flutter app.
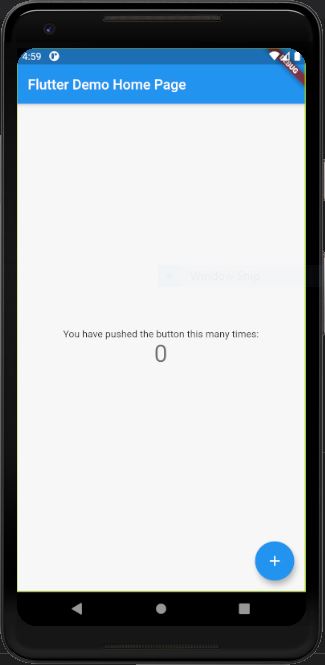
Congrats, you’ve just created your first Flutter app! As you can see, we have our first Flutter application. In main.dart, we have a Stateless MyApp widget that returns the MaterialApp widget. The home option in MaterialApp calls the MyHomePage widget. MyHomePage widget is a stateful widget class that returns a flutter template Scaffold. Here, the stateful widget has states whose value changes and as the state changes the whole widget class re-renders. Such is not the case in stateless widget. Stateless widget class does not hold any state variable and are not subjected to dynamic change and re-render.
Creating a List in Flutter
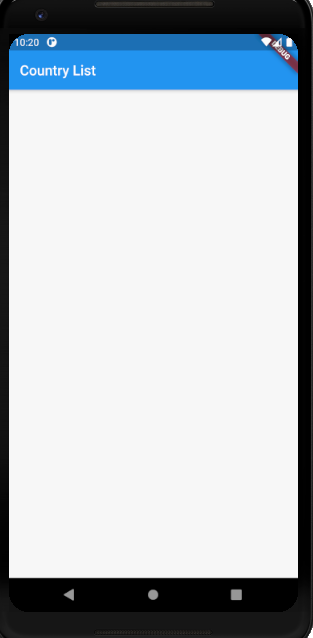
Here, we are going to display a list in the MyHomePage widget class instead of the default Scaffold. For that, we need to clear out the MyHomePage widget first as shown in the code snippet below:
class _MyHomePageState extends State<MyHomePage> {
Widget build(BuildContext context) {
return Scaffold(
appBar: AppBar(
title: Text("Country List"),
),
body: Container()
);
}
}
Hence, we will get the following result in the emulator screen:
Now, we can initialize a List as shown in the code snippet below:
class _MyHomePageState extends State<MyHomePage> {
  List countriesData = [{"name":"Spain"},{"name":"Italy"},{"name":"France"},{"name":"Germany"}];
Now, we need to render out the list in the Scaffold body option. We can make use of the ListView.builder widget to render the dynamic list as shown in the code snippet below:
class _MyHomePageState extends State<MyHomePage> {
List countriesData = [{"name":"Spain"},{"name":"Italy"},{"name":"France"},{"name":"Germany"}];
Widget build(BuildContext context) {
return Scaffold(
appBar: AppBar(
title: Text("Country List"),
),
body: Container(
child: ListView.builder(
itemCount: countriesData.length,
itemBuilder: (context, index) {
return Container(
padding: EdgeInsets.all(20),
child: Text(countriesData[index]['name']),
);
},
),
)
);
}
}
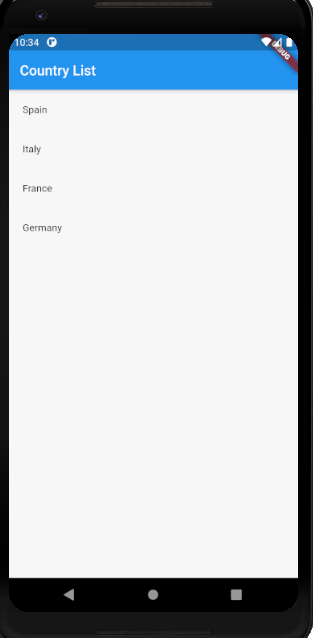
Here, we have returned the Container widget with some padding from the ListView widget. The Container widget has Text with country name value as a child widget.
The ListView widget iterates through the List and provides a builder that builds templates for each item in the List. Hence, we will get the result as shown in the emulator screenshot below:
Mega Bundle Sale is ON! Get ALL of our React Native codebases at 90% OFF discount 🔥
Get the Mega BundleStyling the List Items
Here, we are going to add some styles to the list of items. For that, we can use the decoration property in Container and style property with TextStyle widget in case of Text widget. The overall implementation is provided in the code snippet below:
class MyHomePage extends StatefulWidget {
MyHomePage({Key key, this.title}) : super(key: key);
final String title;
_MyHomePageState createState() => _MyHomePageState();
}
class _MyHomePageState extends State<MyHomePage> {
List countriesData = [{"name":"Spain"},{"name":"Italy"},{"name":"France"},{"name":"Germany"}];
Widget build(BuildContext context) {
return Scaffold(
appBar: AppBar(
title: Text("Country List"),
),
body: Container(
child: ListView.builder(
itemCount: countriesData.length,
itemBuilder: (context, index) {
return Container(
decoration: BoxDecoration(
color: Colors.teal[50],
border:Border(
bottom: BorderSide(width: 1.0, color: Colors.grey),
),
),
padding: EdgeInsets.all(20),
child: Text(countriesData[index]['name'], style: TextStyle(fontSize: 16, fontWeight: FontWeight.bold),),
);
},
),
)
);
}
}
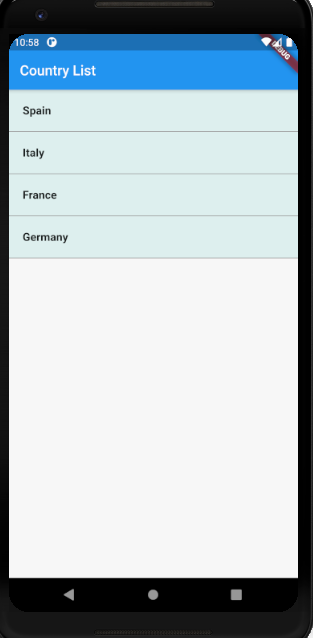
In decoration, we have used BoxDecoration widget to decorate each Container. We can apply any style decoration inside.
Here, we have used the border decoration and color. Hence, we will get the result as shown in the emulator screenshot below:
Fetching Dynamic List Items
Now, we are going to make an API request to fetch the list of countries. For that, we need to install the HTTP package. This package allows us to handle and manage the API calls to the server in Flutter & Dart. In order to install the package, we need to include the following line in the pubspec.yaml and save it.
http: ^0.12.2
Now, we can import it in our main.dart file:
import 'package:http/http.dart' as http;
Next, we need to create a function that handles the API call. This function makes a request to the API using http get method and gets the response for a list of countries in JSON format.
Then, we are going to set the list to our countriesData variable using the setState function as shown in the code snippet below:
_getCountries() async {
    var responseJson;
    final response = await http.get("<https://restcountries.eu/rest/v2/region/africa?fields=name>");
    print('Response body: ${json.decode(response.body)}');
    final List<dynamic> temp = [
        ...json.decode(response.body) as List<dynamic>,
      ];
    setState(() {
      countriesData = temp;
    });
  }
Here, we have used the decode method from json module to parse the response and store it in a dynamic List. Then set the list to countriesData list. Now, we need to call the function
in the initState function. The initState function runs every time the widget class mounts to the screen. Hence, by calling the _getCountries function in initState, we trigger the _getCountries
function every time the app loads. The overall implementation is provided in the code snippet below:
void initState(){
super.initState();
_getCountries();
}
Now if we run our app, we will get the following result on the emulator screen:
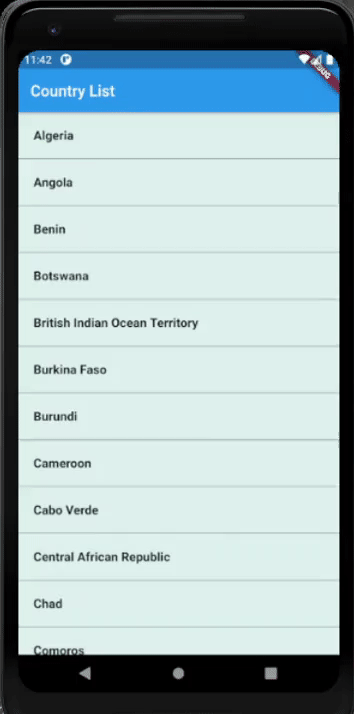
Congratulations, you’ve just created your first fully functional Flutter app. As you can see, the app is fetching a list of countries from a backend and displays is really nicely in a list.
Looking for a custom mobile application?
Our team of expert mobile developers can help you build a custom mobile app that meets your specific needs.
Get in TouchConclusion
Flutter will surely grow into the established mobile application development framework of the future. The community is rapidly growing as more and more developers, as well as software houses, are opting for Flutter as a mobile solution. Its ability to provide pixel-perfect UI with powerful features with simple coding has made it easy for beginners to switch to Flutter. This tutorial aimed to deliver the starting point for Flutter developers. Installing and creating Flutter projects to making API calls is the important first step towards Flutter development. Along with that, we learned some of the most used Widgets for UI development. Now, the challenge is to make the Flutter project structured and applying navigations. Also as we go on, we can learn about many wonderful widgets as well. Take a break and enjoy your win! You’ve just created your first Flutter app. As a next step, try adding more features so you can familiar with even more Flutter UI components, such as adding the country flags to the list items, as images. If you enjoyed our Flutter tutorial, please help us out, by spreading the word with your community and sharing this link in our social bubble.