Gradients are a great tool to enhance the UI of any mobile app. In this tutorial, we are going to learn how to create gradients in Flutter, step by step. You can also jump straight to the source code, since it’s pretty straightforward.

As mobile app developers, we all want our app’s user interface to look great. We want it to be beautiful and modern with correct style combinations which will provide a positive impact on the overall user experience of the app. For achieving such an accurate design for an app UI, we add a lot of things such as text styles, animations, icons, etc. But, another element that makes a huge impact in UI design is the gradient style. It provides a wonderful and soothing interface to look at. Accurate gradient styles can make other elements such as texts and images pop out more. It creates a wonderful visual impact on the user’s eye along with optimizing the user experience.
In this tutorial, we are going to learn how to add gradient styling to the Flutter app. We are going to start with the simple one and move on to the more advanced options. We are going to use a third-party package to add gradient styling to our Flutter app bar.
So, let’s get started!
Setting up the Flutter project
First, we need to create a new Flutter project. For that, make sure that the Flutter SDK and other flutter app development-related requirements are properly installed. If everything is properly set up, then in order to create a project, we can simply run the following command in the desired local directory:
flutter create gradientExample
After the project has been set up, we can navigate inside the project directory and execute the following command in the Terminal to run the project in either an available emulator or an actual device:
flutter run
Creating a Simple Gradient in Flutter
First, we are going to add a simple gradient to our screen body. For that, we can use the gradient property provided by the BoxDecoration widget in the decoration property of the Container widget. In the gradient property, we can use the LinearGradient widget along with begin and end alignments and color properties. The standard example of a simple gradient is provided in the code snippet below:
import 'package:flutter/material.dart';

void main() => runApp(MyApp());

class MyApp extends StatelessWidget {
  @override
  Widget build(BuildContext context) {
    return MaterialApp(
      title: 'Flutter Demo',
      theme: ThemeData(
        primarySwatch: Colors.blue,
      ),
      home: HomePage(),
    );
  }
}

class HomePage extends StatelessWidget {
  @override
  Widget build(BuildContext context) {
    return Scaffold(
      appBar: AppBar(
        title: Text('Flutter'),
      ),
      body: Center(
          child: Container(
        decoration: BoxDecoration(
            gradient: LinearGradient(
              begin: Alignment.topRight,
              end: Alignment.bottomLeft,
              colors: [Colors.green[300],Colors.yellow[400]])),
        child: Center(
          child: Text(
            'Hello Flutter',
            style: TextStyle(
              fontSize: 48.0,
              fontWeight: FontWeight.bold,
              color: Colors.white),
          ),
        ),
      )));
  }
}
Here, we have used the gradient alignment from the top right to bottom left along with color combination with state intensity.
Hence, we will get the result as shown in the screenshot below:

We can notice that the gradient started with the green color on the top right and ended with the yellow color on the bottom left. The intensity of color and fade is managed by the widget itself.
Gradients with Multiple Colors in Flutter
Now, we are going to move to a bit more advanced form of gradients and use multiple colors with multiple stops. The use of widgets is the same as in the simple gradient. The only difference is the adding of stops to our LinearGradient widget along with colors of different intensities to match the stops. The standard example is provided in the code snippet below:
body: Center(
          child: Container(
        decoration: BoxDecoration(
            gradient: LinearGradient(
              begin: Alignment.topRight,
              end: Alignment.bottomLeft,
               stops: [
      0.2,
      0.5,
      0.8,
      0.7
    ],
  colors: [
    Colors.blue[50],
    Colors.blue[100],
    Colors.blue[200],
    Colors.blue[300]
  ])),
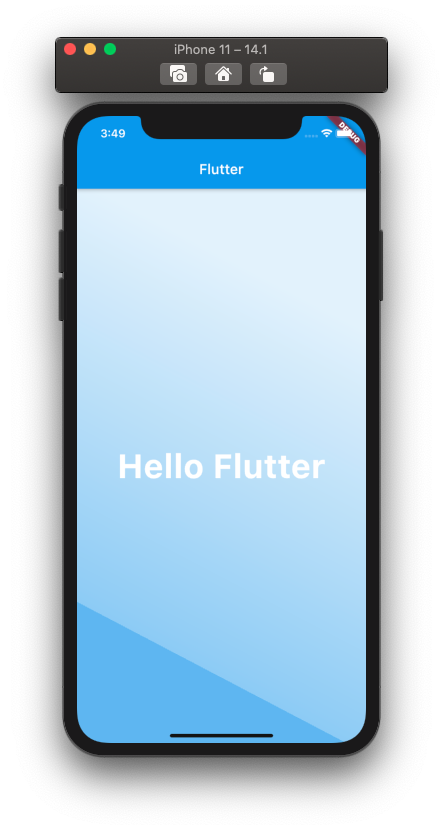
Hence, we will get the result as shown in the emulator screenshot below:

Gradients in The App Bar
Here, we are going to learn how to add the gradient style to the App Bar. In order to do that, we need to use the third-party library called gradient_app_bar.
First, we need to install it. For that, we need to add the following piece of line to the pubspec.yaml file:
dependencies:
  gradient_app_bar: ^0.0.1
  flutter:
    sdk: flutter
Next, we need to import the package in our main.dart file as shown in the code snippet below:
import 'package:gradient_app_bar/gradient_app_bar.dart';
Now, in the appBar property of the Scaffold widget, we need to replace the default AppBar widget with the GradientAppBar widget provided by the package library. The widget is simple we just need to add the start color and end color with required intensities and the widget will take care of the rest.
The basic use of this widget is shown in the code snippet below:
appBar: GradientAppBar(
        title: Text('Flutter'),
        backgroundColorStart: Colors.cyan[100],
        backgroundColorEnd: Colors.blue[400],
      ),
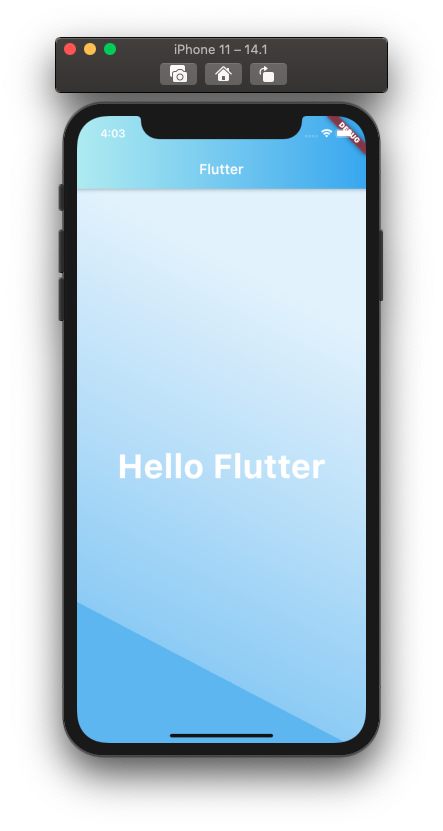
Hence, we will get the result as shown in the emulator screenshot below:
Conclusion
The main goal of this tutorial article was to explore the use of gradients in the Flutter and Dart applications. Gradients do make the app interface look more beautiful and more modern. With a correct color combination and positioning of the gradient, the app will definitely stand out above the rest.
We learned how to add a simple Flutter gradient to the Container widget making our way towards the advanced one. Due to the availability of the gradient_app_bar package, we were able to add gradient styling to our Navigation App Bar as well. You can also try out different color combinations along with other widgets as well, in order to get more familiar with how to create gorgeous Flutter gradients.


