Deep Links in Flutter

It is possible for a web browser to guide you to a specific area of a program that has already been downloaded and installed by creating a link. Additionally, these links may take users to particular content sites (such as events, news updates, and so on) and provide information on the users who have clicked on them (like promo codes).
Instead of emailing the blog.logrocket.com website to a friend, for example, you'd send them a URL that led straight to this article. This would save them the time and effort of searching through the website for it. Your application will need to be enabled either manually or through a deep link, so you'll need to take care of that.
You may also need to handle deep link clicks in any background programs that you have running while the deep link is engaged.
This guide will show you how to utilize uni links to accomplish your objectives.
Mega Bundle Sale is ON! Get ALL of our React Native codebases at 90% OFF discount 🔥
Get the Mega BundleWhat are the Uni Links?
Incoming App/Deep Links (for Android) and universal links, as well as custom URL schemes, are handled by the Uni Links (uni links) Flutter plugin (for iOS).
It's compatible with Android, iOS, and the web right now.
Constructing Uni Link
Add uni_links in the pubspec dependencies
uni_links: ^0.5.1
In the Android or iOS configuration file, you must define the link schema.
Android configuration
Uni Links in Android are divided into two categories:
1. App Links: A specific host, a hosted file (assetlinks.json), and the https scheme (https://your host) are required for this link to operate. This is the intent filter for App Link that you need to include in your settings file. The host may be changed to suit your needs:
<!-- App Links -->
<intent-filter android:autoVerify="true">
<action android:name="android.intent.action.VIEW" />
<category android:name="android.intent.category.DEFAULT" />
<category android:name="android.intent.category.BROWSABLE" />
<!-- Accepts URIs that begin with https://YOUR_HOST -->
<data android:scheme="https" android:host="unilinks.example.com" />
</intent-filter>
2. Deep Links: This link does not need a host, a hoster file, or any kind of individualized scheme to function properly. It makes it possible to use your application by using the URL format of your scheme:/any host. Presented for your consideration is the Deep Link intent filter that should be added to the settings of your site. You also have the option to modify the host and the scheme:
<!-- Deep Links -->
<intent-filter>
  <action android:name="android.intent.action.VIEW" />
  <category android:name="android.intent.category.DEFAULT" />
  <category android:name="android.intent.category.BROWSABLE" />
  <!-- Accepts URIs that begin with YOUR_SCHEME://YOUR_HOST -->
  <data android:scheme="logrckt" android:host="unilinks.example.com" />
</intent-filter>
You need to declare either of these intent filters in your main AndroidManifest.xml file (android/app/src/main/AndroidManifest.xml).
iOS configuration
In iOS, there are also two types of uni links:
1. Universal Links: These are only compatible with the https protocol and need a specific host, entitlements, and a hosted file in order to function. It's a lot like the Android App Links. An associated-domains entitlement must be added or created either using Xcode or by changing the ios/Runner/Runner.entitlements file in the ios/Runner directory.
<?xml version="1.0" encoding="UTF-8"?>
<!DOCTYPE plist PUBLIC "-//Apple//DTD PLIST 1.0//EN" "http://www.apple.com/DTDs/PropertyList-1.0.dtd">
<plist version="1.0">
<dict>
  <!-- ... other keys -->
  <key>com.apple.developer.associated-domains</key>
  <array>
    <string>applinks:[YOUR_HOST]</string>
  </array>
  <!-- ... other keys -->
</dict>
</plist>
2. Custom URL: This URL doesn't require a host, entitlements, a hosted file, or any custom scheme. Similar to a Deep Link in Android, you need to add the host and scheme in the ios/Runner/Info.plist file as below:
<key>CFBundleURLTypes</key>
<array>
  <dict>
      <key>CFBundleTypeRole</key>
      <string>Editor</string>
      <key>CFBundleURLName</key>
      <string>unilinks.example.com</string>
      <key>CFBundleURLSchemes</key>
      <array>
          <string>logrckt</string>
      </array>
  </dict>
</array>
Because Deep Links on Android and Custom URLs in iOS may be claimed by any app, you should make your host and scheme as unique as possible.
Mega Bundle Sale is ON! Get ALL of our React Native codebases at 90% OFF discount 🔥
Get the Mega BundleUsage
There are two ways in which your app will respond to a deep link:
- The phrase "cold start" refers to re-launching an app after it has been shut off (not running in the background). _initURIHandler will be called and given the first link in this scenario.
- Returning the app to the forefront: The Stream will create the link if the program is operating in the background and you need to bring it back to the foreground. The app's initial link might be null or the URL that was used to launch the app.
A single instance of the _initURIHandler should be created for your app, as it is used to launch the app and does not need to be modified at any point along the way. Create a global variable called _initialURILinkHandled and set it to false somewhere in the main.dart:
bool _initialURILinkHandled = false;
In your main.dart file, clean your MyHomePage widget by removing the existing code and creating new variables as below:
Uri? _initialURI;
Uri? _currentURI;
Object? _err;
StreamSubscription? _streamSubscription;
We're declaring here:
- Using the original URI as well as the active/current URI as variables,
- In the event that the link processing fails, this object will be used to hold the error.
- When the app is in the forefront, a StreamSubscription object listens for new connections.
_initURIHandler is the next step, and it's done as follows:
Future<void> _initURIHandler() async {
// 1
if (!_initialURILinkHandled) {
  _initialURILinkHandled = true;
// 2
  Fluttertoast.showToast(
      msg: "Invoked _initURIHandler",
      toastLength: Toast.LENGTH_SHORT,
      gravity: ToastGravity.BOTTOM,
      timeInSecForIosWeb: 1,
      backgroundColor: Colors.green,
      textColor: Colors.white
  );
  try {
// 3
    final initialURI = await getInitialUri();
// 4
    if (initialURI != null) {
      debugPrint("Initial URI received $initialURI");
      if (!mounted) {
        return;
      }
      setState(() {
        _initialURI = initialURI;
      });
    } else {
      debugPrint("Null Initial URI received");
    }
  } on PlatformException { // 5
    debugPrint("Failed to receive initial uri");
  } on FormatException catch (err) { // 6
    if (!mounted) {
      return;
    }
    debugPrint('Malformed Initial URI received');
    setState(() => _err = err);
  }
}
}
You have done the following in the code that is shown above:
In this situation, we used a check to ensure that the _initURIHandler would only be invoked once, regardless of whether or not a widget is eventually deleted.
-
Whenever this function was called, it would display a toast by making use of the fluttertoast package.
-
We parsed the link by using the
getInitialUrifunction, and we saved the result in the variableinitialURIas a new URI. -
Analyzed the value of the
initialURIto determine whether or not it was null. If not null, the value of_initialURIshould be set relative to initialURI. -
PlatformException was used to handle the platform notifications when they failed.
-
Handled the FormatException in the event that the link did not meet the requirements to be a URI.
Create the _incomingLinkHandler function next, which will be used to accept links even when the app has already been started:
void _incomingLinkHandler() {
// 1
if (!kIsWeb) {
// 2
  _streamSubscription = uriLinkStream.listen((Uri? uri) {
    if (!mounted) {
      return;
    }
    debugPrint('Received URI: $uri');
    setState(() {
      _currentURI = uri;
      _err = null;
    });
// 3
  }, onError: (Object err) {
    if (!mounted) {
      return;
    }
    debugPrint('Error occurred: $err');
    setState(() {
      _currentURI = null;
      if (err is FormatException) {
        _err = err;
      } else {
        _err = null;
      }
    });
  });
}
}
The following were the effects of this code:
-
In light of the fact that the web platform will manage the connection only in its capacity as an initial link, a requirement to verify the platform has been included.
-
Maintain the
_currentURIand_errvariables by keeping an ear out for the stream of links that are about to come in. -
Errors were dealt with utilizing the onError event, and the
_currentURIand_errvariables were brought up to date.
You will need to call these methods before the widget tree is generated once you have created them in order to be able to listen to incoming links. To initialize the MyHomePage widget, use these methods inside the initState function:
void initState() {
super.initState();
_initURIHandler();
_incomingLinkHandler();
}
Similarly, to let go of the resources when the app is terminated, close the StreamSubscription object in the dispose method:
void dispose() {
_streamSubscription?.cancel();
super.dispose();
}
Next, update the build method:
Widget build(BuildContext context) {
return Scaffold(
appBar: AppBar(
title: Text(widget.title),
),
body: Center(
child: Padding(
padding: const EdgeInsets.symmetric(horizontal: 20),
child: Column(
mainAxisAlignment: MainAxisAlignment.center,
children: <Widget>[
// 1
ListTile(
title: const Text("Initial Link"),
subtitle: Text(_initialURI.toString()),
),
// 2
if (!kIsWeb) ...[
// 3
ListTile(
title: const Text("Current Link Host"),
subtitle: Text('${_currentURI?.host}'),
),
// 4
ListTile(
title: const Text("Current Link Scheme"),
subtitle: Text('${_currentURI?.scheme}'),
),
// 5
ListTile(
title: const Text("Current Link"),
subtitle: Text(_currentURI.toString()),
),
// 6
ListTile(
title: const Text("Current Link Path"),
subtitle: Text('${_currentURI?.path}'),
)
],
// 7
if (_err != null)
ListTile(
title:
const Text('Error', style: TextStyle(color: Colors.red)),
subtitle: Text(_err.toString()),
),
const SizedBox(height: 20,),
const Text("Check the blog for testing instructions")
],
),
)));
}
We have performed the following actions at this point:
-
If the
_initialURIvariable was used to accept the request, the Initial Link was shown. -
Added a checkbox so that the incoming links will only be shown on mobile devices.
-
Presented the name of the host that was receiving the inbound connection. The host was already specified when we first introduced it.
-
Displayed the scheme of the incoming link that had been set before, comparable to the host.
-
The value of the
_currentURIvariable was used to display the currently selected or active inbound link. -
Showed the route that was associated with the host as well as the scheme
-
If it is not null, the error will be shown.
After you`ve built and restarted your application, it should seem like follows:
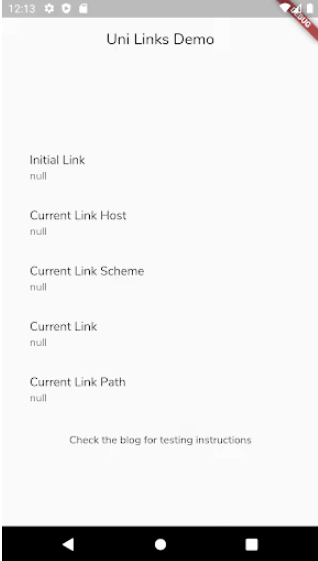
Because the program was manually restarted, all of the ListTile's subtitles are null on mobile. The next step is to perform a test on your modifications.
Testing your deep links
CLI tools may be used to test your modifications by invoking the links registered with your scheme.
Android
Make sure you’ve installed Android Studio (the SDK platform-tools are already installed) before proceeding.
adb shell 'am start -W -a android.intent.action.VIEW -c android.intent.category.BROWSABLE -d "logrckt://host/path/subpath"'
adb shell 'am start -W -a android.intent.action.VIEW -c android.intent.category.BROWSABLE -d "logrckt://unilinks.example.com/path/portion/?uid=123&token=abc"'
adb shell 'am start -W -a android.intent.action.VIEW -c android.intent.category.BROWSABLE -d "logrckt://unilinks.example.com/?arr%5b%5d=123&arr%5b%5d=abc&addr=1%20Nowhere%20Rd&addr=Rand%20City%F0%9F%98%82"'
adb shell 'am start -W -a android.intent.action.VIEW -c android.intent.category.BROWSABLE -d "logrckt://unilinks.@@malformed.invalid.url/path?"'
As a result of this, your app will take precedence over all other apps on your phone’s screen.
Instead, use $ANDROID HOME”/platform-tools/ if you have the $ANDROID HOME env option. and as per the above-mentioned instructions.
The command may also be executed via an ADB shell.
iOS
you may perform the following if Xcode is already installed on your computer:
/usr/bin/xcrun simctl openurl booted "logrckt://host/path/subpath"
/usr/bin/xcrun simctl openurl booted "logrckt://unilinks.example.com/path/portion/?uid=123&token=abc"
/usr/bin/xcrun simctl openurl booted "logrckt://unilinks.example.com/?arr%5b%5d=123&arr%5b%5d=abc&addr=1%20Nowhere%20Rd&addr=Rand%20City%F0%9F%98%82"
/usr/bin/xcrun simctl openurl booted "logrckt://unilinks.@@malformed.invalid.url/path?"
You could immediately call xcrun (or simctl) if it's on your route. Using the booted flag implies that the simulator is open and running a booted device.
logrckt may be used for App Links or Universal Links by using the https protocol.

Looking for a custom mobile application?
Our team of expert mobile developers can help you build a custom mobile app that meets your specific needs.
Get in TouchConclusion
We've gained an understanding of deep linking and how you may use it in your Flutter app via the course of this session. You may attempt deep linking using Firebase Dynamic Links as the next step. These links are useful since they continue to function even if the user has not yet installed the app and simply lead the user to the Play Store or the App Store to complete the installation.