In this tutorial we are going to elaborate on what are the common ways to add support for persistent storage in Flutter apps. More precisely, we are going to create a real app, and showcase in details how to persist data to disk in Flutter apps.

Most of the mobile applications today store some data that will be used again and again every time the application is launched. On mobile devices, the application can run in the background or exit at any time. While exiting, the app can be in any state. Now, it is necessary for the application code to take care of this without the users having to concern themselves on whether that data of a particular state has been appropriately stored for later access. The management and handling of such a state are known as data persistence which can be done by applying a persistent storage mechanism in the Flutter application. It is necessary to retain the data that was before the application has been shut off.
In this tutorial, we are going to learn about using persistent storage in the Flutter apps for data persistence. For that, we are going to make use of the package called shared_preferences. Then, we are going to implement the login state or user’s logged-in session handling as an example use-case to demonstrate the use of persistent storage in the Flutter. Along the way, we will also learn the use of different UI widgets as well as configurations to handle the state of different screens. So, let’s get started!
Setting Up the Project
First, we need to create a new Flutter project. For that, make sure that the Flutter SDK and other flutter app development-related requirements are properly installed. If everything is properly set up, then in order to create a project, we can simply run the following command in the desired local directory:
flutter create persistent_storage_example
After the project has been set up, we can navigate inside the project directory and execute the following command in the terminal to run the project in either an available emulator or an actual device:
flutter run
Creating the Login Page
Since we are going to learn about persistent storage for Flutter, what better than to try it on login credentials to handle the user session state in the application. First, we are going to create a Login screen UI. For that, we need to create a file called Login.dart in the ./lib directory of our flutter project. Then, we can make use of the code from the code snippet below:
import 'package:flutter/material.dart';
import 'package:persistant_storage_example/main.dart';

class Login extends StatefulWidget {
  @override
  State<StatefulWidget> createState() {
    return LoginState();
  }
}

class LoginState extends State<Login> {
  TextEditingController usernamec = TextEditingController();
  TextEditingController passwordc = TextEditingController();
  final formKey = GlobalKey<FormState>();

  @override
  Widget build(BuildContext context) {
    return Scaffold(
      appBar: AppBar(
        title: Text("Login"),
      ),
      body: Column(
        children: <Widget>[
          Expanded(
            child: Container(
              child: SingleChildScrollView(
               scrollDirection: Axis.vertical,
                child: Padding(
                padding: const EdgeInsets.only(top: 50.0),
                child: Form(
                  key: formKey,
                  child: Padding(
                    padding: const EdgeInsets.all(20.0),
                    child: Column(
                      mainAxisAlignment: MainAxisAlignment.center,
                      children: <Widget>[
                        SizedBox(height: 50),
                        TextFormField(
                          controller: usernamec,
                          decoration: InputDecoration(
                              hintText: 'Username',
                              labelText: 'Username',
                              contentPadding: EdgeInsets.all(25),
                              border: OutlineInputBorder(
                                borderRadius: BorderRadius.circular(3.0)
                              )
                          ),
                          keyboardType: TextInputType.text,
                        ),
                        SizedBox(height: 15),
                        TextFormField(
                          controller: passwordc,
                          obscureText: true,
                          decoration: InputDecoration(
                              hintText: '*******',
                              labelText: 'Password',
                              contentPadding: EdgeInsets.all(25),
                              border: OutlineInputBorder(
                                borderRadius: BorderRadius.circular(3.0)
                              )
                          ),
                        ),
                        SizedBox(height: 25),
                        MaterialButton(
                          padding: EdgeInsets.fromLTRB(12.0, 14.0, 12.0, 14.0),
                          color: Colors.black45,
                          shape: new RoundedRectangleBorder(
                            borderRadius: new BorderRadius.circular(5.0),
                          ),
                          child: Text(
                            'Log In',
                            style: TextStyle(fontSize: 16, color: Colors.white, fontWeight: FontWeight.bold),
                          ),
                          onPressed: () {
                          },
                        ),
                      ]
                    ),
                  ),
            ),
            ),
          ),
        ),
          ),
        ],
      ),
    );
  }
}
Here, we have placed a basic Scaffold widget with an App bar and body containing a Column widget. The Column widget houses three children widgets. Two for TextFormField widgets for username and password and a MaterialButton widget for the login button. They are styled using their own available properties. The two TextFormField widgets are controlled by their own TextEditingController.
Scaffolding the Home Screen
Now, that our login screen UI is ready. We can move on to making some changes to our Home screen UI. The class widget for the Home screen is already available in the main.dart file named MyHomePage. We need to make few changes to it to serve our purpose of showing persistent storage in use. The overall changes made to main.dart file for the Home page UI is provided in the code snippet below:
import 'package:flutter/material.dart';

void main() {
  runApp(MyApp());
}

class MyApp extends StatelessWidget {
  @override
  Widget build(BuildContext context) {
    return MaterialApp(
      title: 'Flutter Demo',
      theme: ThemeData(
        primarySwatch: Colors.blue,
      ),
      home: MyHomePage(),
    );
  }
}

class MyHomePage extends StatefulWidget {
  MyHomePage({Key key}) : super(key: key);
  @override
  _MyHomePageState createState() => _MyHomePageState();
}

class _MyHomePageState extends State<MyHomePage> {

  bool isLoggedIn = false;

  @override
  void initState() {
    super.initState();
  }

  @override
  Widget build(BuildContext context) {
    return Scaffold(
      appBar: AppBar(
        title: Text("Persistant Storage Example"),
      ),
      body: Center(
        child: Column(
          mainAxisAlignment: MainAxisAlignment.center,
          children: <Widget>[
            Text(
              (isLoggedIn == true)?'You are logged in': 'You are Logged Out',
              style: TextStyle(fontSize: 20, fontWeight: FontWeight.bold),
            ),
          ],
        ),
      ),
      floatingActionButton: FloatingActionButton(
        onPressed: (){
        },
        child: Icon((isLoggedIn == true)?Icons.logout: Icons.login),
      ),
    );
  }
}
Here, we have returned a Scaffold widget with an App bar and body containing the Text widget. The Scaffold widget also holds the floatingActionButton which will allow us to navigate to the login screen as well as operate as a logout button if a user is logged in. Here, we have also defined a userLoggedIn variable with a boolean type which will handle the overall login state of the user. Based on the value of userLoggedIn state, we apply conditional rendering to UI as well as functional operations. Now, we need to apply the code to navigate to the Login page in the onPressed event of the FloatingActionButton widget as shown in the code snippet below:
floatingActionButton: FloatingActionButton(
  onPressed: (){
    Navigator.push(
      context,
      MaterialPageRoute(
          builder: (context) => Login()
      )
    );
  },
  tooltip: 'Increment',
  child: Icon((isLoggedIn == true)?Icons.logout: Icons.login),
),
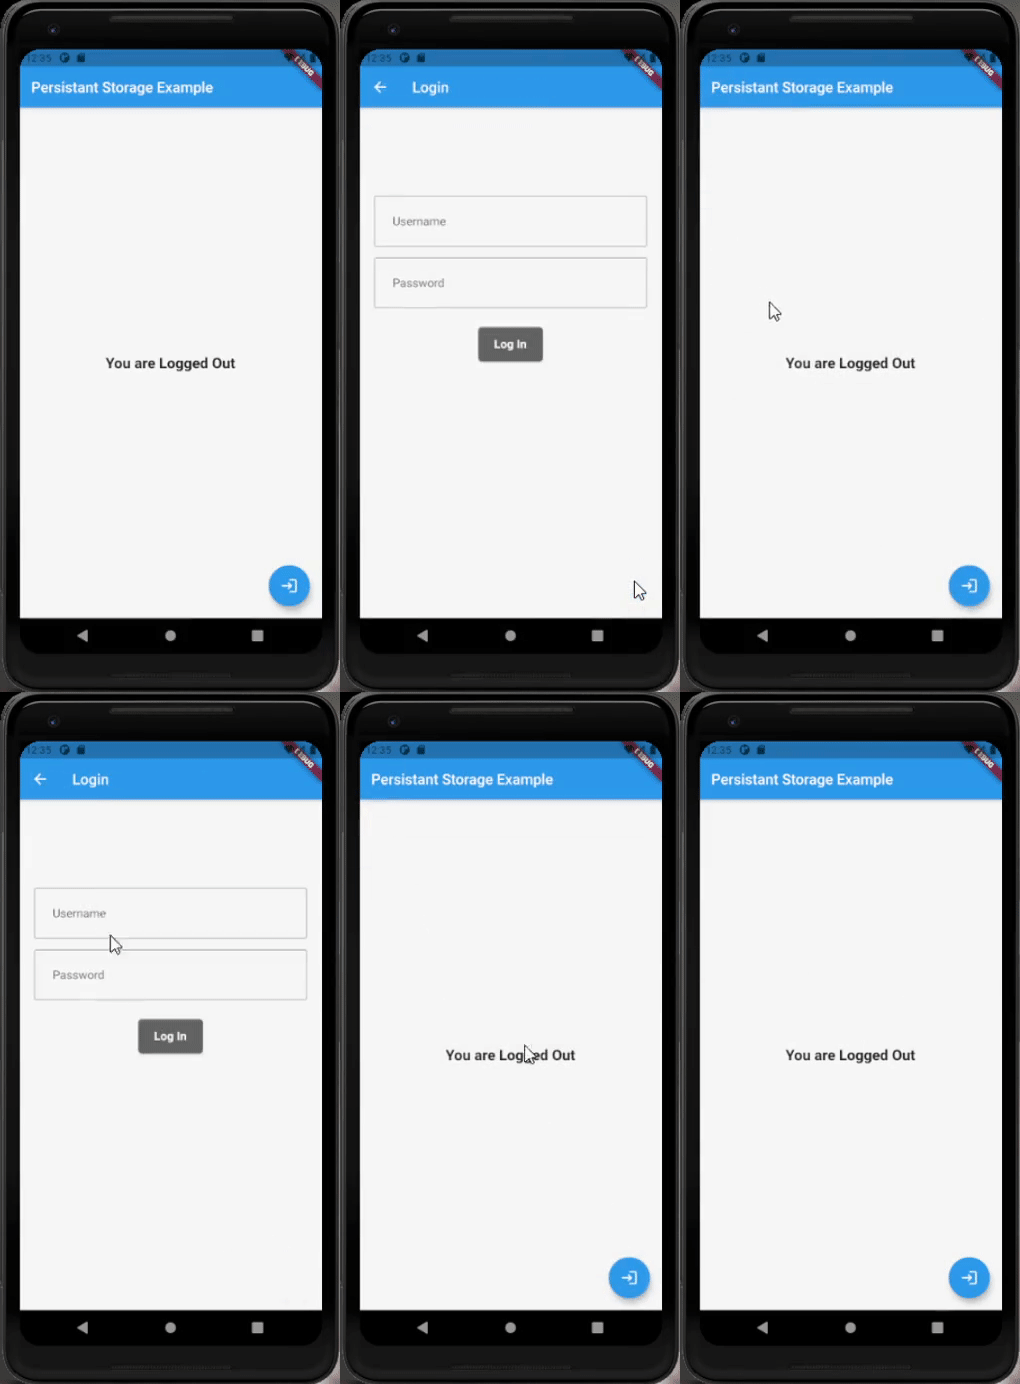
Hence, we can now see the overall UI of the Home screen as well as the Login screen in the demo below:  Now, we move on to configuring our persistent storage. Here, we are going to make use of the shared_preferences package.
Installing the Package
Now, we are going to install the package called shared_preferences that will provide a persistent storage mechanism for Flutter applications. This package provides configurations that wrap platform-specific persistent storage for simple data (NSUserDefaults on iOS and macOS, SharedPreferences on Android, etc.). Normally, you would have to write native platform integrations for storing data on both iOS and Android. Fortunately, the shared_preferences plugin can be used to persist key-value data on disk. To install this package, we need to add the following piece of code to pubspec.yaml file as shown in the code snippet below:
dependencies:
  flutter:
    sdk: flutter

  shared_preferences: ^2.0.5
Configuring the Login Function
Now, we are going to implement a Login function. In this function, we will make use of the SharedPreferences instance. This instance will give us access to different methods such as setString, setBoolean, setInt, etc. which will enable us to store the key-value pair based on the value data type. First, we need to import this package in our Login.dart file as shown in the code snippet below:
import 'package:shared_preferences/shared_preferences.dart';
Now, we are going to implement a function called _performLogin(). The overall implementation is provided in the code snippet below:
_performLogin() async {
     SharedPreferences prefs = await SharedPreferences.getInstance();
     prefs.setString("username", usernamec.text);
     prefs.setBool("isLoggedIn", true);
     Navigator.push(context,
        MaterialPageRoute(
            builder: (context) => MyHomePage()
        )
      );
  }
Here, we have initialized the SharedPreferences instance on a variable called perfs. Now, using this instance object, we have set two key-value pairs. One to store the username entered in the text field and another to store the user session state called isLoggedIn which is of boolean type. Once, these two values are stored, we then navigate to the Home page screen. Now, these two values can be accessed from anywhere in the application. Even after the app is closed and launched again, these two values persist until they are explicitly removed. Now, we need to assign this function to the onPressed event of the MaterialButton widget representing the Login button as shown in the code snippet below:
MaterialButton(
  padding: EdgeInsets.fromLTRB(12.0, 14.0, 12.0, 14.0),
  color: Colors.black45,
  shape: new RoundedRectangleBorder(
    borderRadius: new BorderRadius.circular(5.0),
  ),
  child: Text(
    'Log In',
    style: TextStyle(fontSize: 16, color: Colors.white, fontWeight: FontWeight.bold),
  ),
  onPressed: () {
    _performLogin();
  },
),
Handle Login State in Home Page using SharedPreferences
Now, we are going to show if the user is logged in or not on the Home page using the same stored key-value pair from the Login.dart. The idea is to render out the UI that shows the username of the user as well as a logout button if the user is logged in. Once logged out using the logout button, we show the user has logged out on the screen and show the login button in place of logout. First, we need to import the package in the main.dart file as well as shown in the code snippet below:
import 'package:shared_preferences/shared_preferences.dart';
Now, we need to implement a function that fetches the users’ information and login information that was set during the login operation. The overall implementation is provided in the code snippet below:
String username;
SharedPreferences prefs;

void sharedPreferenceInit () async{
  prefs = await SharedPreferences.getInstance();
  isLoggedIn = prefs.getBool("isLoggedIn");
  username = prefs.getString("username");
  setState(() {
  });
}
Here, we have created a function called sharedPreferenceInit which will initialize the SharedPreferences instance for the overall Home page state. Then, we have fetched the isLoggedIn value using the getBool method assigning the key as the parameter. The returned value is set to isLoggedIn variable of the Home page. Then, we have also fetched the username of the user using getString method and set it to the username variable. In the end, we have called the setState function in order to re-render the entire Home page UI once this information is fetched. Since we need this function to run every time the Home Screen is mounted on the app, we need to call this function inside initState function as shown in the code snippet below:
@override
void initState() {
  super.initState();
  sharedPreferenceInit();
}
Note that, once we have got a hold of this isLoggedIn state, we can use it to handle any user logged-in state operations across the entire application. Now, we can render out the username based on the isLoggedIn variable state as shown in the code snippet below:
body: Center(
  child: Column(
    mainAxisAlignment: MainAxisAlignment.center,
    children: <Widget>[
      Text(
        (isLoggedIn == true)?'You are logged in as: $username': 'You are Logged Out',
        style: TextStyle(fontSize: 20, fontWeight: FontWeight.bold),
      ),
    ],
  ),
),
Implementing the Logout Function
Now, we also need a function that will trigger the logout operation. The implementation of the function called _performLogout is provided in the code snippet below:
_performLogout(){
  prefs.remove("username");
  prefs.setBool("isLoggedIn", false);
  sharedPreferenceInit();
  setState(() {
  });
}
In this function, we have first removed the key-value pair with key as username using the remove method provided by the SharedPreferences instance. Then, we have set the isLoggedIn key-value to false and call the sharedPreferenceInit() function. This will enable us to update the value of the username and isLoggedIn variables of the Home page state. Now, we need to assign this function to onPressed event of the FloatingActionButton based on the isLoggedIn condition as shown in the code snippet below:
floatingActionButton: FloatingActionButton(
  onPressed: (){
    if(isLoggedIn == true){
      _performLogout();
    }else{
      Navigator.push(
        context,
        MaterialPageRoute(
            builder: (context) => Login()
        )
      );
    }
  },
  tooltip: 'Increment',
  child: Icon((isLoggedIn == true)?Icons.logout: Icons.login),
),
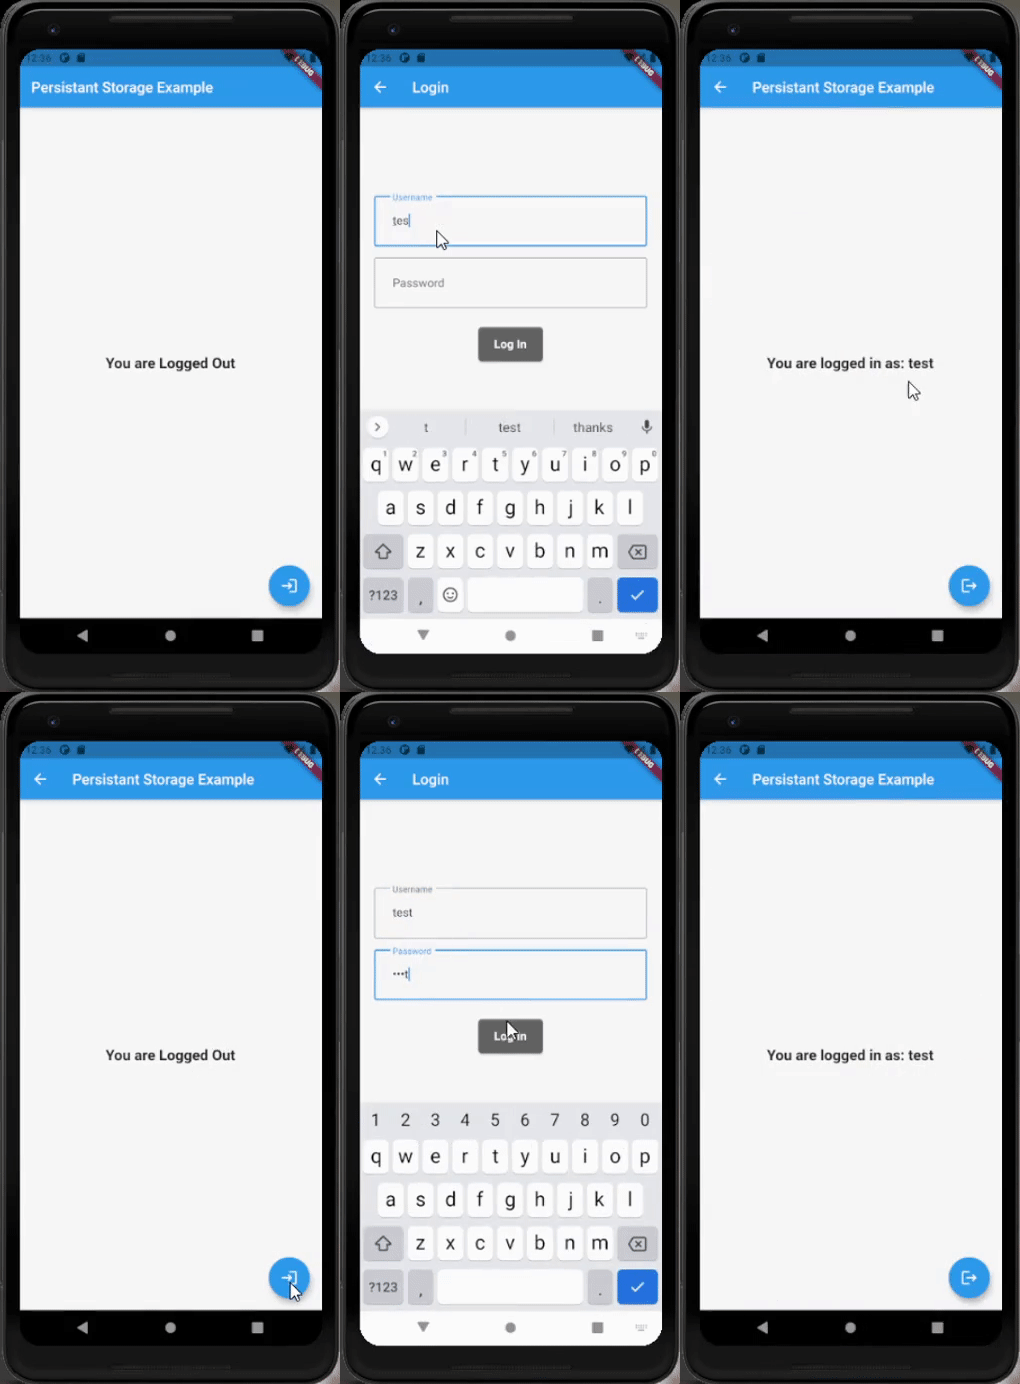
Now based on the isLoggedIn state value, either the logout operation is performed or the navigation to the Login screen. The overall result of the use of the persistent storage in the Flutter application to handle the user’s logged-in state is shown in the demo below:  As we can see, once we log in the username of the user is shown on the Home screen, and the button at the bottom corner changes to the logout button. And once logged out is triggered, the user logged out information is shown on the screen, and the button changes to the login button. Similar conditional UI rendering and functional operations can be handled using persistent storage in the Flutter application. The implementation was simple and easy where everything was handled using simple key-value pair storage.
Conclusion
The main objective of this tutorial was to demonstrate the use of persistent storage in Flutter apps. The article shows its use by taking the user login state handling as an example. The availability of the shared_preferences package made the storing of data to disk easy.
As you can see, our example is a simple store of key-value pairs. But, we can also store objects, arrays, and map type values as well. There are also other packages available for large-scale projects to follow a similar mechanism. You can definitely try them out as well and implement similar functionality. I hope this tutorial was successful in making the concept of persistent storage in the Flutter environment clear and simple.


