Flutter’s new Navigator and Router API is described in detail in this post. These new functionalities may have been referred to as the Router widget in Flutter’s open design documents. Using these APIs, you’ll be able to fine-tune control over your app’s displays, and you’ll learn how to parse routes. These new APIs don’t break anything; they merely add a new declarative API to the list of available options. If you wanted to relocate or delete a page from the bottom of a stack, Navigator 2.0 made it much easier. It’s OK if you’re content with how the Navigator works right now, so long as you don’t mind the changes. Using the Router, the underlying platform’s routes may be handled and the relevant pages are shown. The Router is set up to show the relevant page based on the browser URL in this article.

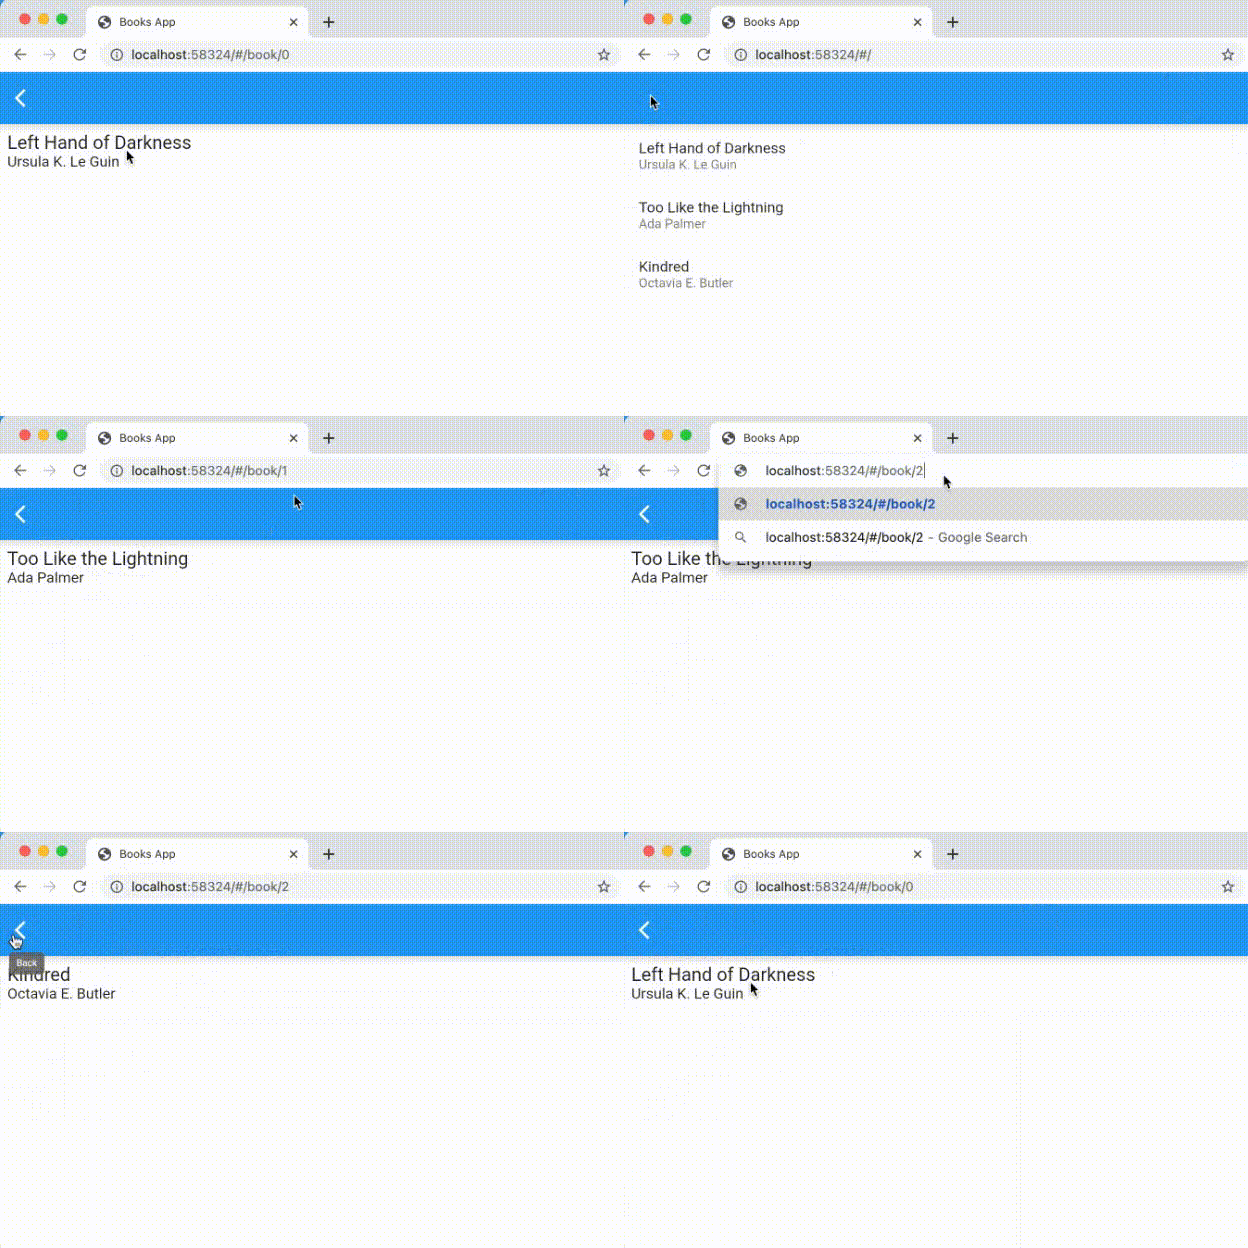
This article demonstrates how to use Navigator 2.0 to parse browser URLs and manage the active stack of pages and which Navigator pattern works best for your project. In this tutorial, you’ll learn how to develop an app that receives incoming routes from the platform and controls your app’s pages. Using this GIF, you can see the software in action:

Version 1.0 of Navigator
Assuming you’re using Flutter, you’re presumably already aware of the Navigator and the accompanying terms:
• Widget that keeps track of a collection of Route objects, Navigator.
• MaterialPageRoute is an example of a Navigator object that represents a page on a screen.
In earlier versions of Navigator, routes were added to the Navigator’s stack by either pushing or popping them as named or anonymous routes. The next parts provide a quick review of these two methods.
Anonymous routes
Stacks of displays are common in most mobile applications. Using the Navigator in Flutter, this can be done easily. MaterialApp and CupertinoApp already have a navigator built into them. ‘ Access to navigator is available via Navigator. of() or use Navigator to bring up a new window. Navigator will take you back to the previous screen if you use Navigator.pop(context):
import 'package:flutter/material.dart';
void main() {
  runApp(Nav2App());
}
class Nav2App extends StatelessWidget {
  @override
  Widget build(BuildContext context) {
    return MaterialApp(
      home: HomeScreen(),
    );
  }
}
class HomeScreen extends StatelessWidget {
  @override
  Widget build(BuildContext context) {
    return Scaffold(
      appBar: AppBar(),
      body: Center(
        child: FlatButton(
          child: Text('View Details'),
          onPressed: () {
            Navigator.push(
              context,
              MaterialPageRoute(builder: (context) {
                return DetailScreen();
              }),
            );
          },
        ),
      ),
    );
  }
}
class DetailScreen extends StatelessWidget {
  @override
  Widget build(BuildContext context) {
    return Scaffold(
      appBar: AppBar(),
      body: Center(
        child: FlatButton(
          child: Text('Pop!'),
          onPressed: () {
            Navigator.pop(context);
          },
        ),
      ),
    );
  }
}
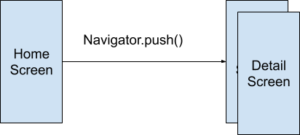
The DetailScreen widget is stacked on top of the HomeScreen widget when push() is invoked, as seen below:

As long as the preceding screen (HomeScreen) remains in the widget tree, the accompanying State object will be present on DetailScreen.
Named routes
A MaterialApp or CupertinoApp’s route parameter may be used to specify a named route.
import 'package:flutter/material.dart';
void main() {
  runApp(Nav2App());
}

class Nav2App extends StatelessWidget {
  @override
  Widget build(BuildContext context) {
    return MaterialApp(
      routes: {
        '/': (context) => HomeScreen(),
        '/details': (context) => DetailScreen(),
      },
    );
  }
}

class HomeScreen extends StatelessWidget {
  @override
  Widget build(BuildContext context) {
    return Scaffold(
      appBar: AppBar(),
      body: Center(
        child: FlatButton(
          child: Text('View Details'),
          onPressed: () {
            Navigator.pushNamed(
              context,
              '/details',
            );
          },
        ),
      ),
    );
  }
}

class DetailScreen extends StatelessWidget {
  @override
  Widget build(BuildContext context) {
    return Scaffold(
      appBar: AppBar(),
      body: Center(
        child: FlatButton(
          child: Text('Pop!'),
          onPressed: () {
            Navigator.pop(context);
          },
        ),
      ),
    );
  }
}
Determining paths is necessary. Despite the fact that you may give parameters to a named route, you cannot parse arguments from the named route. This means that you cannot interpret an ID like /details/:id if the app is running on the web.
routes using onGenerateRoute, a more advanced naming convention
A more flexible way to handle named routes is by using onGenerateRoute. Using this API, you’ll be able to take care of all of the following:
onGenerateRoute: (settings) {
  // Handle '/'
  if (settings.name == '/') {
    return MaterialPageRoute(builder: (context) => HomeScreen());
  }

  // Handle '/details/:id'
  var uri = Uri.parse(settings.name);
  if (uri.pathSegments.length == 2 &&
      uri.pathSegments.first == 'details') {
    var id = uri.pathSegments[1];
    return MaterialPageRoute(builder: (context) => DetailScreen(id: id));
  }

  return MaterialPageRoute(builder: (context) => UnknownScreen());
},
Here’s the complete example:
import 'package:flutter/material.dart';

void main() {
  runApp(Nav2App());
}

class Nav2App extends StatelessWidget {
  @override
  Widget build(BuildContext context) {
    return MaterialApp(
      onGenerateRoute: (settings) {
        // Handle '/'
        if (settings.name == '/') {
          return MaterialPageRoute(builder: (context) => HomeScreen());
        }

        // Handle '/details/:id'
        var uri = Uri.parse(settings.name);
        if (uri.pathSegments.length == 2 &&
            uri.pathSegments.first == 'details') {
          var id = uri.pathSegments[1];
          return MaterialPageRoute(builder: (context) => DetailScreen(id: id));
        }

        return MaterialPageRoute(builder: (context) => UnknownScreen());
      },
    );
  }
}

class HomeScreen extends StatelessWidget {
  @override
  Widget build(BuildContext context) {
    return Scaffold(
      appBar: AppBar(),
      body: Center(
        child: FlatButton(
          child: Text('View Details'),
          onPressed: () {
            Navigator.pushNamed(
              context,
              '/details/1',
            );
          },
        ),
      ),
    );
  }
}

class DetailScreen extends StatelessWidget {
  String id;

  DetailScreen({
    this.id,
  });

  @override
  Widget build(BuildContext context) {
    return Scaffold(
      appBar: AppBar(),
      body: Center(
        child: Column(
          mainAxisAlignment: MainAxisAlignment.center,
          children: [
            Text('Viewing details for item $id'),
            FlatButton(
              child: Text('Pop!'),
              onPressed: () {
                Navigator.pop(context);
              },
            ),
          ],
        ),
      ),
    );
  }
}

class UnknownScreen extends StatelessWidget {
  @override
  Widget build(BuildContext context) {
    return Scaffold(
      appBar: AppBar(),
      body: Center(
        child: Text('404!'),
      ),
    );
  }
}
This instance of RouteSettings is called settings. In Navigator.pushNamed, or initialRoute, the name and arguments fields reflect the values that were supplied.


