In this article, we’re going to demonstrate how to use the camera on your phone to capture a photo in Flutter and then show it to you on the screen. In the last piece, a significant amount of discussion was devoted to setting up various permissions and conditions.
How to Use Camera in Flutter
Step 1: Installing the camera plugin is the first thing you need to do. Through the use of the camera plugin, we will be able to take photographs using the device’s built-in camera. Begin by adding a reliance on the camera in the pubspec.yaml file, as seen in the implementation below:
dependencies:
  flutter:
    sdk: flutter
  # The following adds the Cupertino Icons font to your application.
  # Use with the CupertinoIcons class for iOS style icons.
  cupertino_icons: ^1.0.2
  camera: ^0.10.0+3
Step 2: Take your time to read and understand the following starting code, Then copy it into your editor, We will get to know what it does in the coming section
import 'dart:io';

import 'package:camera/camera.dart';
import 'package:flutter/material.dart';

void main() {
  runApp(const MyApp());
}

class MyApp extends StatelessWidget {
  const MyApp({super.key});

  @override
  Widget build(BuildContext context) {
    return const MaterialApp(
      title: 'Flutter Camera Demo',
      home: HomeScreen(),
    );
  }
}

class HomeScreen extends StatefulWidget {
  const HomeScreen({Key? key}) : super(key: key);

  @override
  State<HomeScreen> createState() => _HomeScreenState();
}

class _HomeScreenState extends State<HomeScreen> {
  XFile? image;

  @override
  Widget build(BuildContext context) {
    return Scaffold(
      body: SafeArea(
        child: Column(
          crossAxisAlignment: CrossAxisAlignment.stretch,
          mainAxisAlignment: MainAxisAlignment.spaceAround,
          children: [
            image == null
                ? const Icon(Icons.image)
                : Image.file(File(image!.path)),
            Padding(
              padding: const EdgeInsets.all(24.0),
              child: TextButton(
                style: TextButton.styleFrom(
                  backgroundColor: Colors.green,
                ),
                onPressed: () {
                  _showCamera();
                },
                child: const Text("Take Picture",
                    style: TextStyle(color: Colors.white)),
              ),
            )
          ],
        ),
      ),
    );
  }
The _showCamera method is in charge of gaining access to the various cameras that are currently accessible, after which it navigates the user to a different view where they may examine the shot. The camera that faces backward will be the first one to be installed.
void _showCamera() async {
  final cameras = await availableCameras();
  final camera = cameras.first;
  if (!mounted) return;
  final result = await Navigator.push(
      context,
      MaterialPageRoute(
          builder: (context) => TakePicturePage(camera: camera)));

}
There is currently no TakePicturePage. The user will be able to take a picture with their camera thanks to TakePicturePage. After that, you’ll learn how to show the camera preview to the user and then transmit the recorded picture back to the HomePage so it can be shown on the screen.
Using the Camera to Take a Picture
You may snap a picture of yourself by clicking the camera option. The TakePicturePage is going to allow them to preview the picture and then capture it with a tap of the button.
The CameraController is used to take photos by the TakePicturePage. CameraController is also used to set up and configure the preview. Here’s how the TakePicturePage widget is set up for use:
class TakePicturePage extends StatefulWidget {
  final CameraDescription camera;

  const TakePicturePage({Key? key, required this.camera}) : super(key: key);

  @override
  State<TakePicturePage> createState() => _TakePicturePageState();
}

class _TakePicturePageState extends State<TakePicturePage> {
  late CameraController _cameraController;
  late Future _initializeCameraControllerFuture;

  @override
  void initState() {
    super.initState();
    _cameraController =
        CameraController(widget.camera, ResolutionPreset.max);
    _initializeCameraControllerFuture = _cameraController.initialize();
  }
To construct a TakePicturePage widget, you must provide a camera as an argument. The initState function of the TakePicturePage widget is also responsible for initializing the camera controller, making it a stateful widget.
The camera preview is the next stage. To make this work, you’ll need to use an Android emulator or an actual Android smartphone. Please be aware that using the iOS simulator to preview or take a photo will not function.
The camera preview implementation is displayed in the following code:
@override
Widget build(BuildContext context) {
  return Scaffold(
    floatingActionButton: FloatingActionButton(
        child: const Icon(Icons.camera),
        onPressed: () => _takePicture(context)),
    body: FutureBuilder(
      future: _initializeCameraControllerFuture,
      builder: (context, snapshot) {
        if (snapshot.connectionState == ConnectionState.done) {
          return SizedBox(
              width: MediaQuery.of(context).size.width,
              height: MediaQuery.of(context).size.height,
              child: CameraPreview(_cameraController));
        } else {
          return const Center(child: CircularProgressIndicator());
        }
      },
    ),
  );
}
During the process of evaluating the _initCameraControllerFuture, we made use of the CameraView in order to offer a camera preview. If the Future has not yet finished resolving, the CameraPreview widget is replaced with a CircularProgressIndicator() instead of being shown.
You can see the results of this experiment in the graphic that follows:
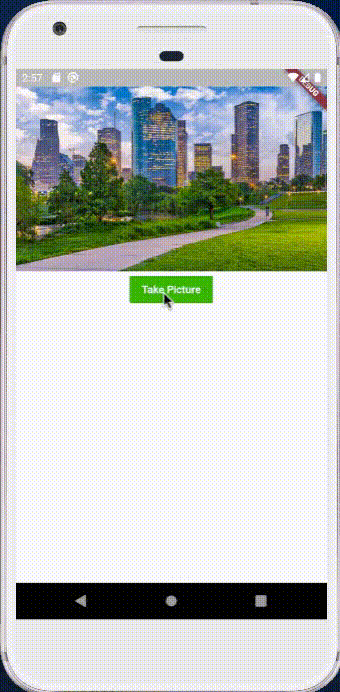
The Android operating system makes use of a technique known as fake room emulation, which enables users to practice shooting images by means of simulators without first having to install the app on an actual device.
Always test the application on a physical device before releasing it to the production environment.
The very last thing you need to do is snap the image. Our Stack now has two children after we added a FloatingButton as the second one. The taking of the photograph is going to be controlled by the button. The _takePicture function will be executed whenever the button is touched. The following is how the _takePicture method should be implemented:
void _takePicture(BuildContext context) async {
  try {
    if (!_cameraController.value.isTakingPicture) {
      XFile image = await _cameraController.takePicture();
      if (!mounted) return;
      Navigator.pop(context, image);
    } else {
      ScaffoldMessenger.of(context)
        ..hideCurrentSnackBar()
        ..showSnackBar(
            const SnackBar(content: Text('Already taking a picture.')));
    }
  } catch (e) {
    debugPrint('$e');
  }
}
The first thing that we do is sit back and wait for the _initializeCameraControllerFuture to finish resolving. After the future has been determined, we are given the path to the temporary directory where the picture will be stored after it has been saved. In the last step, we instruct the _cameraController instance to take a photo by using the takePicture method, which then saves the image to a predetermined location. After we have finished taking the image, we will pop the page from the stack, and then we will send back the route by including it as the second parameter in the call to the Navigator.pop function. This indicates that the caller may now acquire access to the path and make use of it to show the photograph that was just recently shot.
Don’t forget to dispose the _cameraController after you are done using it in the dispose function to avoid memory leaks:
@override
void dispose() {
  _cameraController.dispose();
  super.dispose();
}
When we come back to the HomePage widget, we get the route from the Navigator, and then we set the state in the manner shown below:
void _showCamera() async {
  final cameras = await availableCameras();
  final camera = cameras.first;
  if (!mounted) return;
  final result = await Navigator.push(
      context,
      MaterialPageRoute(
          builder: (context) => TakePicturePage(camera: camera)));
  if (result != null) {
    setState(() {
      image = result;
    });
  }
}
As a result of the fact that we are altering the value of the image variable while the setState closure is active, the construct function will be called, which will ultimately result in the shown of the taken picture. The following is a demonstration of the build function’s implementation:
class _HomeScreenState extends State<HomeScreen> {
  XFile? image;

  @override
  Widget build(BuildContext context) {
    return Scaffold(
      body: SafeArea(
        child: Column(
          crossAxisAlignment: CrossAxisAlignment.stretch,
          mainAxisAlignment: MainAxisAlignment.spaceAround,
          children: [
            image == null
                ? const Icon(Icons.image)
                : Image.file(File(image!.path)),
            Padding(
              padding: const EdgeInsets.all(24.0),
              child: TextButton(
                style: TextButton.styleFrom(
                  backgroundColor: Colors.green,
                ),
                onPressed: () {
                  _showCamera();
                },
                child: const Text("Take Picture",
                    style: TextStyle(color: Colors.white)),
              ),
            )
          ],
        ),
      ),
    );
  }
The result is shown below:
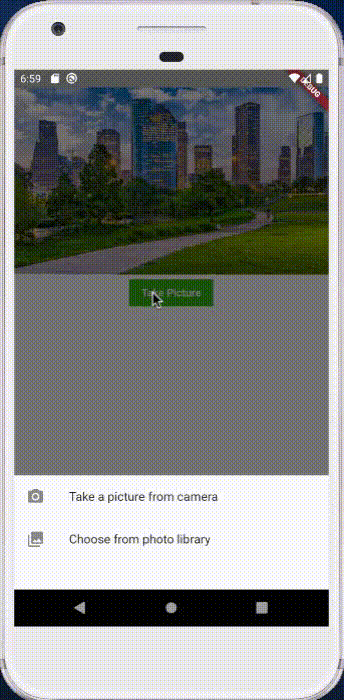
Through reading this article, we have gained the knowledge necessary to get a picture from a physical device and present it on the website. I strongly suggest that you download the code, install the app on a smartphone, and give it a try before making any decisions.