For front-end web and mobile developers, AWS Amplify is a suite of tools and services that can be used together or separately to enable them to create scalable full-stack apps on AWS. App backends and connections can be configured in minutes with Amplify, static web applications can be deployed quickly and simply managed outside of the AWS interface with a few clicks.

Popular web frameworks like JavaScript, React, and Angular as well as mobile platforms such as Android, iOS, and React Native is supported by the Amplify platform. AWS Amplify may help you go to market more quickly. In order to add authentication capability to Flutter using AWS Amplify, We’ll be following the instructions on this page
https://docs.amplify.aws/start/getting-started/installation/q/integration/flutter/.
Using the Amplify CLI, we’ll examine how many AWS resources are generated.
Step 1: Amplify CLI
Your application may make use of AWS cloud services by using the Amplify Command Line Interface (CLI), which is a single toolchain.

Install & validate dependencies
Node and npm are prerequisites for the Amplify CLI. Installing and verifying these should be your first step. We will utilize the AWS Command Line Interface (AWS CLI) to evaluate the resources that were generated in AWS.
>>node --version
v14.17.0
>>npm --version
6.14.13
>>git --version
'git version 2.30.0
>>aws --version
aws-cli/2.1.22 Python/3.7.4 Darwin/20.5.0 exe/x86_64 prompt/off
Install Amplify CLI
➜ curl -sL https://aws-amplify.github.io/amplify-cli/install | bash && $SHELL
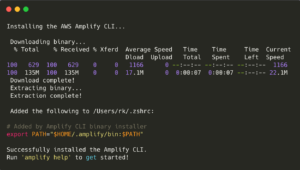
Verify
➜ amplify --version 5.1.0
➜ amplify help
Step 2: Configure
It’s time to enter the AWS Web portal and establish an AWS IAM (Identity & Access Management) user.
➜ amplify configure
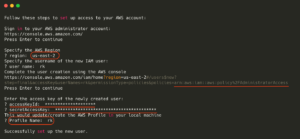
In this phase, what happens?
• Region: AWS resources are produced in a specific region of the cloud service.
• User name: The IAM User’s given name.
• AdministratorAccess was used to create this new IAM user. The AWS account may now be accessed by the user indefinitely.
• The online console displays the user’s AccessKey and SecretAccessKey after they’ve been generated. Programmatically (through SDK/CLI) connecting to AWS requires these.
• Please enter your username here. It utilizes a preset profile by default. If we want to access numerous users or accounts via the CLI, we need to have distinct profile names for each one. My profile name is RK in this scenario.
• If everything goes according to plan, the user configuration is stored in two files locally. The files are ~/.aws/config and ~/.aws/credentials.
Verify
➜ aws configure list --profile rk
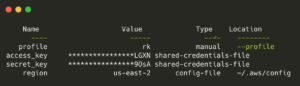
These two keys are really important. They should not be shared or included in any public source repositories.
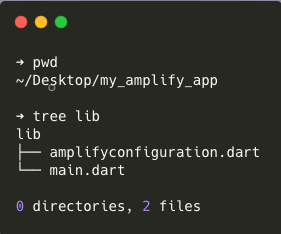
Step 3: Implement Flutter into an Existing App
➜ flutter create my_amplify_app
Amplify dependencies should be included in pubspec.yaml.
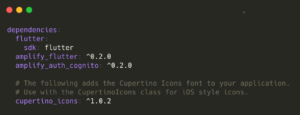
➜ cd ~/desktop/my_amplify_app
➜ flutter pub get
Mac OS Specific changes
To make specific modifications to Mac OS, follow these instructions in the link.
https://docs.amplify.aws/lib/project-setup/create-application/q/platform/flutter/
Step 4: Set up the backend of the system (Create AWS Resources)
In this stage, two roles are created with the assistance of AWS CloudFormation.
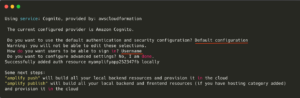
➜ cd ~/desktop/my_amplify_app
➜ amplify init
What takes place when we are doing this step?
• In this stage, two IAM Roles will be created by using AWS CloudFormation.
• It makes use of the AWS Profile that was configured in the step before that (step 2).
• By treating infrastructure as code, AWS CloudFormation makes it simple to model a collection of connected AWS and third-party resources, provision them in a timely and consistent manner, and manage them throughout their lifecycles.
• A CloudFormation template will specify the needed resources as well as their dependencies. This will allow the resources to be launched and configured as a stack together.
Confirming the reliability of the sources
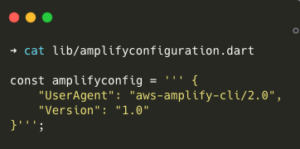
• Within the lib folder, a new file called amplifyconfiguration.dart is generated. It will include the information that the Flutter application needs in order to connect to AWS. At this moment, there are no specifics available about it.
➜ cat lib/amplifyconfiguration.dart
AWS Resources that have been developed
• Step 2’s IAM user and password may be used to access the AWS Web interface and see resources generated in step 3.
• The AWS CLI is another option.
The second choice is what we’re going with here.
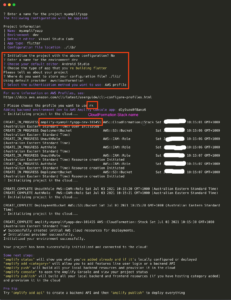
# Update the stack name.
# Get the stack name from the log created above.
➜ stack_name='amplify-myamplifyapp-dev-101455'
Stack Resources
➜ aws --profile rk cloudformation list-stack-resources \
--stack-name ${stack_name} \
--query 'StackResourceSummaries[].[LogicalResourceId, PhysicalResourceId, ResourceType, ResourceStatus]' \
--output table
Authenticated Users and Unauthenticated Users have different roles in the system
# Role for Authenticated users
→ aws --profile rk iam list-attached-role-policies --role-name "${stack_name}-authRole"
{
      "AttachedPolicies": []
}

# Role for unauthenticated users
→ aws --profile rk iam list-attached-role-policies  --role-name "${stack_name}-unauthRole"
{
      "AttachedPolicies": []
}

# s3 bucket used for Code deployment
→ aws --profile rk_s3api list-objects \
             --bucket "${stack_name}-deployment" ) \
             --query 'Contents[].[{Key:Key, Size:Size}]') \
              --output table

# CloudFormation template used to deploy the resources.
→ aws cloudformation get-template --profile rk --stack-name ${stack_name}
{
   "AWSTemplateFormatVersion": "2010-09-09",
   "Description": "Root Stack for AWS Amplify CLI",
   "Parameters": {
        "DeploymentBucketName": {
              "Description": "Name of the common deployment bucket provided by the parent stack",
              "Type": "String",
              "Default": "DeploymentBucket"
          },
          "AuthRoleName" : {
               "Type": "String",
               "Default": "AuthRoleName"
          },
          "UnauthRoleName" : {
               "Type": "String",
               "Default": "UnauthRoleName"
           }
     },
"Resources" : {
     ....
 }
• This position has no IAM linked to it.
• Only a number of roles and no more resources have been established yet for the Flutter App to make use of. That’s what we’ll take care of next.
Step 5: Adding Support for Authentication to Flutter App Using AWS Cognito
AWS Cognito is an acronym for what?
Your online and mobile applications may benefit from authentication, authorization, and user management features made available by Amazon Cognito. Your users have the option of logging in directly using a user name and password, or they may do so via a third-party service such as Facebook, Amazon, Google, or Apple.
Amazon Cognito’s user pools and identity pools are its two most important constituent parts. User pools are user directories that provide your app’s users the opportunity to sign up for and sign in to your application. You will be able to provide your customers with access to additional AWS services by using identity pools. You are free to combine or utilize user pools and identity pools in any combination you see fit.
Where can I find out more about User Pools?
• User pools are nothing more than an organized gathering of people.
• Using AWS Cognito, users may sign up, sign in, and change their passwords, as well as do other tasks such as creating new accounts.
• The usage of User Pools is entirely optional. Social Login is also supported by AWS Cognito, allowing Flutter App users who already have accounts with Google, Facebook, and other services to log in.
What does it mean to have a pool of identities?
• It is not sufficient to just provide Authentication. What AWS services may the user access after he has logged in?
• A set of credentials (either permanent or temporary) is required to access any AWS service.
• Amazon Web Services provide Security Token Service (STS) credentials.
• Roles are one method of obtaining them. A role has a set of policies attached to it.
• Two roles are associated with an Identity Pool: one for authorized users and one for visitors (Unauthenticated users).
➜ cd ~/desktop/my_amplify_app
➜ amplify add auth
➜ amplify push
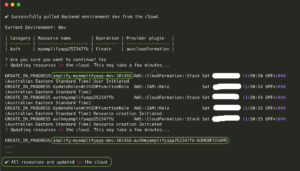
In this phase, what happens?
• In Step #4, the CloudFormation template was deployed.
• CloudFormation templates have been updated.
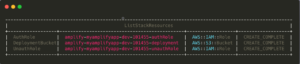
Let’s have a look at the newly generated or updated resources.
# Update the template names
# Refer the log file above to get these names.
➜ stack_name1='amplify-myamplifyapp-dev-101455'
➜ stack_name2='amplify-myamplifyapp-dev-101455-authmyamplifyapp252347fb-NJME8P3IS6M5'
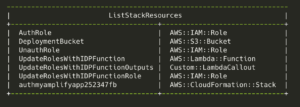
Stack #1 has been updated with the latest changes.
The last word about that this stack generates a new one.
→ aws --profile rk cloudformation list-stack-resources \
            --stack-name ${stack_name1} \
            --query 'StackResourceSummaries [ ] . [LogicalResourceId, ResourceType]' \
            --output table
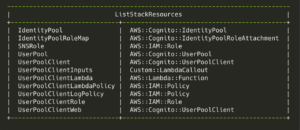
Resources created by Stack #2
→ aws --profile rk cloudformation list-stack-resources \
            --stack-name ${stack_name2} \
            --query 'StackResourceSummaries [ ] . [LogicalResourceId, ResourceType]' \
            --output table
Find out how to look at the resources’ CloudFormation templates
➜ aws cloudformation get-template --profile rk --stack-name ${stack_name1}
➜ aws cloudformation get-template --profile rk --stack-name ${stack_name2}
List User Pools
➜ aws --profile rk cognito-idp list-user-pools --max-results 20 \
--query 'UserPools[].[Id, Name, CreationDate]' \
--output table
Create a list of identity pools.
➜ aws --profile rk cognito-identity list-identity-pools --max-results 20 \
--query 'IdentityPools[].[IdentityPoolId, IdentityPoolName]' \
--output table
Identify the responsibilities that Identity Pools play.
➜ aws --profile rk cognito-identity get-identity-pool-roles \
--identity-pool-id "us-east-2:xxxxxxx-b706-xxxx-xxxx-b14e9b1d9b22"
amplifyconfiguration.dart
User pool and Identity pool information are added to the lib/amplifyconfiguration.dart file by the CLI program. This will be used to establish an AWS connection by the Flutter app.
const amplifyconfig =  ' ' '   {
       "UserAgent": "aws-amplify-cli/2.0",
       "Version": "1.0",
       "auth":  {
               "plugins":  {
                      "aws CognitoAuthPlugin":  {
                                   "UserAgent": "aws-amplify-cli/0.1.0",
                                   "Version": "0.1.0",
                                   "IdentityManager": {
                                          "Default": {}
                                    },
                                   "CredentialsProvider": {
                                            "CognitoIdentity": {
                                                     "Default": {
                                                             "PoolId": "us-east-2:XXXX-XXXX-XXXX-XXXX-XXXX",
                                                             "Region": "us-east-2"
                                                      }
                                             }
                                     },
                                     "CognitoUserPool" : {
                                              "Default": {
                                                       "PoolId": "us-east-2_m70Wexxxx",
                                                       "AppClientId": "xXxx",
                                                       "Region": "us-east-2"
                                               }
                                      },
                                      "Auth": {
                                             "Default": {
                                                      "authenticationFlowType": "USER_SRP_AUTH"
                                              }
                                        }
                           }
                  }
         }
} ' ' ' ;
Backend resources utilized
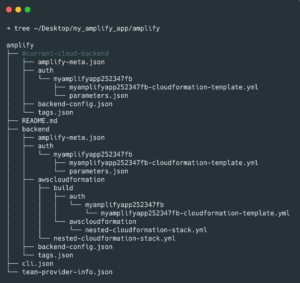
You can find the AWS Amplify CLI templates and files in the amplify folder of your Flutter project. Keep in mind that none of this is required for the Flutter app to function. AWS Resource creation is the sole use for these
Step 6: Make the Flutter Application more secure by adding authentication.
As soon as the resources on the backend are set up, the Flutter app may begin using the Cognito service.
Initialization
class Auth extends ChangeNotifier {
   bool isSignUpComplete = false;
   bool isSignedIn = false;
   String? username;

  Auth() {
       configureCognitoPluginWrapper();
  }

  Future<void> configureCognitoPluginWrapper() async {
       await configureCognitoPlugin();
  }

Future<void> configureCognitoPlugin() async {
   // Add Cognito Plugin
    AmplifyAuthCognito authPlugin = AmplifyAuthCognito();

    await Amplify.addPlugins([authPlugin]);

   // Once Plugins are added, configure Amplify
   // Note: Amplify can only be configured once.
    try {
        await Amplify.configure(amplifyconfig);
        }
        on AmplifyAlreadyConfiguredException {
        print(
               "Tried to reconfigure Amplify; this can occur when your app restarts on Android.");
        }

        Amplify.Hub.listen( [HubChannel.Auth), (hubEvent) {
               switch (hubEvent.eventName) {
                   case "SIGNED_IN":
                       print("USER IS SIGNED IN");
                       break;
                   case "SIGNED_OUT":
                       print("USER IS SIGNED OUT" );
                       break;
                   casę "SESSION EXPIRED":
                       print("SESSION EXPIRED");
                       break;
               }
           });
  }
SignUp Functionality
/// Signup a User
Future<void> signUp(String username, String password, String email) async {
    try {
      Map<String, String> userAttributes = {
            "email": email,
            "phone_number": "",
       },

       SignUpResult res = await Amplify.Auth.signUp(
          username: username,
          password: password,
          options: CognitoSignUpOptions (
              userAttributes: userAttributes,
          ),
       );

       isSignUpComplete = res.isSignUpComplete;
      } on AuthException catch (e) {
        print(e);
        throw (e);
      } catch (error) {
        print(error);
        throw (error);
      }
  }
Confirm User Functionality
/// Confirm User
 Future<void> confirm(String username, String confirmationCode) async {
      try {
         SignUpResult res = await Amplify.Auth.confirmSignUp(
            username: username,
            confirmationCode: confirmation Code,
         ),

         isSignUpComplete = res.isSignUpComplete;
      } on AuthException catch (e) {
         throw (e);
      } catch (error) {
         throw (error);
      }
  }
SignIn Functionality
/// Signin a User
 Future<void> signIn(String username, String password) async {
      try {
         SignInResult res = await Amplify.Auth.signIn(
             username: username,
             password: password,
          );
       } on AuthException catch (e) {
         print(e);
         throw (e);
      } catch (error) {
         print(error);
         throw (error);
      }
   }
Others
Future<bool> _isSignedIn() async {
    final session = await Amplify.Auth.fetchAuthSession();
    return session.isSignedIn;
}

// Sign Out the User.
Future<void> signOut() async {
     try {
        await Amplify.Auth.signOut();
      } on AuthException catch (e) {
         print(e);
         throw (e);
      }
}

Future<String> fetchSession() async {
     try {
       AuthSession session = await Amplify.Auth.fetchAuthSession(
            options: CognitoSessionOptions(getAWSCredentials: true),
        );

        return session.isSignedIn.toString();
     } on AuthException catch (e) {
        print(e);
        throw (e);
     }
}

Future<String> getCurrentUser() async {
     try {
        AuthUser res = await Amplify.Auth.getCurrentUser();
        return res.username;
      } on AuthException catch (e) {
        print(e);
        throw (e);
      }
 }
Step 7: An Example of Application
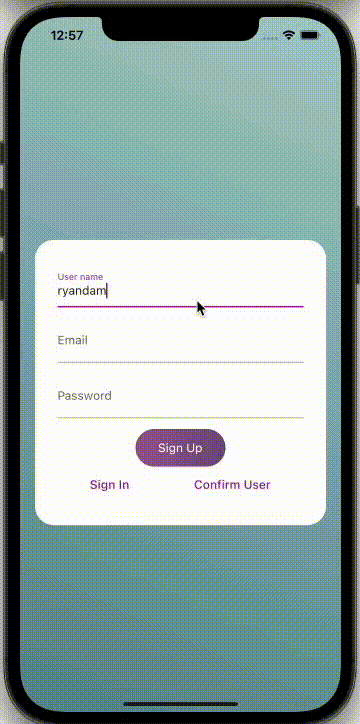
Cognito User pools are updated with the information of authorized users in this manner.
Final notes
• To make the code seem more presentable, we went to https://carbon.now.sh/.
• This program doesn’t do much more but support authentication, and that’s about it. In addition, Amplify allows users to add REST APIs, S3, and other services.
• A page on Github dedicated to AWS Amplify may be found at https://github.com/aws-amplify/amplify-flutter.
• Amplify CLI is not required to be used in the configuration of the Cognito User Pools and Identity Pools. It is also possible to create them by using the AWS Web Console or any other method. After that, the user pool and identity pool IDs may be adjusted in the lib/amplifyconfiguration.dart file.